The Tracking tab, available in the Work workspace, has been designed to provide Project Managers with all the tools they need to manage the impacts of the Team Members Timesheet on their projects. The Tracking tab makes it possible for the user to:
Review potential discrepancies between the Timesheets and the initial plan.
Analyze the Team Members detailed Timesheets.
Approve, Apply, or Rework the Timesheets accordingly.
Analyze and manage the impacts of the “Apply” action on the schedule (in terms of dates, rate, and effort).
In order to ensure an all-in-one user experience in the Tracking tab, the view provides smooth navigation with a series of full screen views. When in a full screen view, the Close ( ) button, located in the upper right corner of the header, allows the user to switch the view back to the Home Page.
The Work workspace, Tracking tab, provides the Projects Data Selector, which displays all the Projects for which the logged-in user is Manager 1, 2, or 3.
For further information on the use of the Project Data selector, please refer to the Library section of this topic.
The main toolbar is located on the top of the view and aims at providing the most important project information and commands.
The display of the main toolbar differs depending on the tab currently selected and whether the project is locked or unlocked.
Here is the list of the buttons users can encounter in the Project workspaces:
 | New | Allows the user to create a new project. |
 | Publish | Publishes any changes to the current project, but only if the current project is the active Working version. |
 | Edit | Opens the Project Administration dialog box. |
 | Lock | Locks the project so that other users cannot modify it. Upon locking a project, the Undo and Redo commands become available. Note This command is only available if the project is not yet locked by any user. |
 | Unlock | Unlocks a previously locked project. Note This command is only available if the project has been locked by the logged-in user. |
 | Undo | Erases the previous change done, reverting the project to its previous state. Note This command is only available if the project has been locked by the logged-in user. |
 | Redo | Reverses the action of the Undo command. Note This command is only available if the project has been locked by the logged-in user. |
 | Manage Evaluation Snapshot | Opens the Evaluation Trend dialog box. |
 | Change Scoring Template | Allows the user to modify the Template that is used to score and describe the project. |
 | Update from Connected Idea | Allows the user to update the scoring and descriptions with the values of a connected Idea. |
 | Manage Baselines | Opens the Manage Baselines dialog box. |
 | Workflow Actions | Allows the user to modify the Workflow State Vote associated with the project. |
 | Workflow | Displays the Workflow Information dialog box. |
 | More | Provides access to the following commands:
|
 | Review Assignments | Opens the Assignments Scheduling full screen view. |
 | Status Report History | Opens the Status Report History full screen view. |
 | Notes | Indicates whether or not there are new notes, and opens the Notes dialog box. |
 | Switch to Tracking Mode | Enables users to switch from Planning Mode to Tracking Mode. Only available if the Schedule Method is Critical Chain. |
 | Switch to Planning mode | Enables users to switch from Tracking Mode to Planning Mode. Only available if the Schedule Method is Critical Chain. |

The upper section of the "By Resources" view Mode provides all the necessary tools for the user to not only navigate in the views, but also to define the items displayed in the Timesheets.
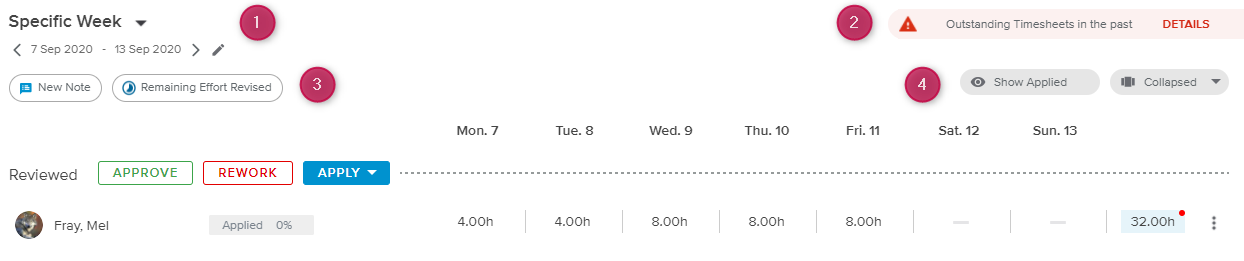 |
Time Frame Selection – Allows the user to select the Timesheets Time Frame.
Outstanding Timesheets in the past alert – Indicates whether some Timesheets from the past have to be dealt with.
Filtering options – Allows the user to only display specific Timesheets.
Display options – Allows the user to display or not display more detailed Timesheet information.
Last Impacts button – Provides access to the Impact Management full screen view.
The Time Frame selection pick-list allows the user to select a time frame for the Timesheets from among the following: “Current Week”, “Previous Week”, “Specific Week”, “Current Month”, “Previous Month”, “Specific Month”, and “Custom”.
For all the aforementioned options except “Custom”, the user has the ability to navigate between time frames by clicking on the Previous ( ) and Next (
 ) buttons.
Upon choosing the “Specific Week” or “Specific Month” options, the user will be prompted to choose a date; the resulting time frame will be the corresponding week or month containing the date selected.
Once a specific Time Frame is selected, the user can click on the Edit ( ) button to modify it.
Upon choosing the “Custom” option, the user will be prompted to choose a Start and Finish date for the desired time frame.
The time-distributed intervals displayed will be conditioned by the selected dates as follows:
When the Finish date is set up to 12 days after the Start date, the intervals displayed will be in days,
When the Finish date is set between 13 days and 12 weeks after the Start date, the intervals displayed will be in weeks,
When the Finish date is set between 13 weeks and 12 months after the Start date, the intervals will be displayed in months,
When the Finish date is set 13 months or more after the Start date, the intervals will be displayed in years.
Once a custom Time Frame is selected, the user can click on the Edit () button to modify it.
The following filtering options are available:
| New Notes | Only displays the Timesheets wherein a new Note has been entered. Upon clicking on the Notes button, the Timesheet Daily Notes popup is displayed. For the By Tasks view mode, this option is only available if the Display Option is Expanded. |
 | Remaining Effort Revised | Only displays the Timesheets wherein the Team Member has entered a new Remaining Effort. For the By Tasks view mode, this option is only available if the Display Option is Expanded. |
 | Corrections | Only displays the Timesheets wherein some corrections have been entered. For the By Tasks view mode, this option is only available if the Display Option is Collapsed. |
The following display options are available:
 | Show Applied | Allows the user to display or hide Timesheets whose Status is “Applied”. |
 | Display | Allows the user to select one of the following display:
|
Display Options | Upon clicking on the Display Options button, the Display Options pop-up appears enabling users to set up two options:
This command is only available for the By Tasks View Mode. |
The Timesheets Overview provides the list of Resource Timesheets, grouped by overall Status.
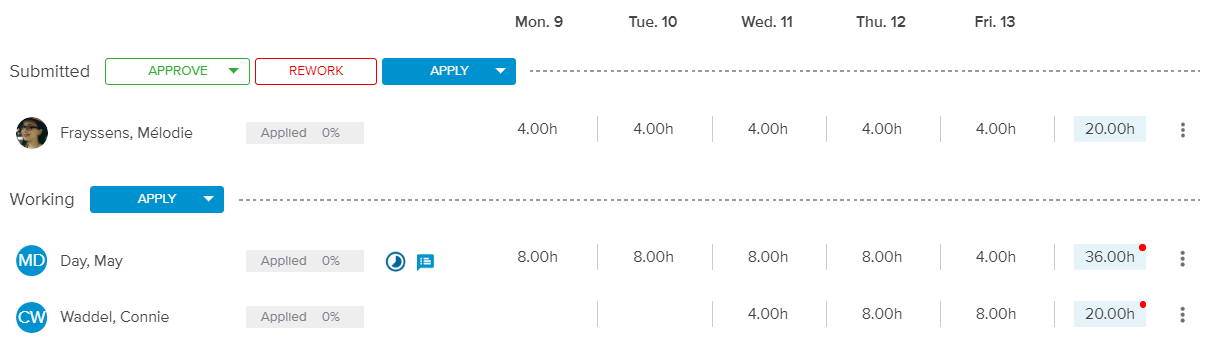 |
Each Status section can provide the following commands (depending on the Status) to perform bulk actions on all the Timesheets displayed for the section:
Approve – Allows the Project Manager to indicate that he/she accepts the submitted data.
Rework – Sends back the submitted data to the appropriate Team Member for modification.
Apply – Applies the submitted data to the selected Project Tasks.
Each Resource Timesheet provides the following information: Status, Resource Name, and Timesheet % Applied.
Clicking on the Resource’s name opens the corresponding Timesheet Details full screen view.
 |
If the Contract Type feature is enabled, External Resources will be flagged with the External ( ) icon.
In addition, the following alerts can be displayed:
| Remaining Effort Revised | Indicates that the Remaining Effort entered by the Team Member is not equal to the planned Remaining Effort value. |
| New Notes | Indicates that at least one Note has been entered. |
| Corrections | Indicates that some corrections have been entered. |
On the right-hand side of the Resource Timesheet information, the time-distributed Actual Effort for the selected project is displayed, with the overall Actual Effort appearing just below it when the “Expanded” () display option is activated. The Total values for the selected Time Frame will be available as well in the last column of the Timesheet.
A red dot can be displayed next to the Total value depending on the encountered alerts.
For more information regarding these alerts, please refer to the Notifications and Alerts article available in the Library of this topic.
The Timesheet More ( ) button can provide the following commands (depending on the Status) to perform individual actions on each Timesheet:
Open Resource Brief – Provides access to the corresponding Resource Brief dialog box.
Apply – Applies the submitted data to the selected Project Tasks.
Approve – Allows the Project Manager to indicate that he/she accepts the submitted data.
Reset Actuals – Allows the Project Manager to reset the Actual Effort for labor assignments with some manual progress prior to applying the Timesheet.
Rework – Sends back the submitted data to the appropriate Team Member for modification.

The upper section of the "By Tasks" View Mode provides all the necessary tools for the user to not only navigate in the views, but also to define the items displayed in the Timesheets.
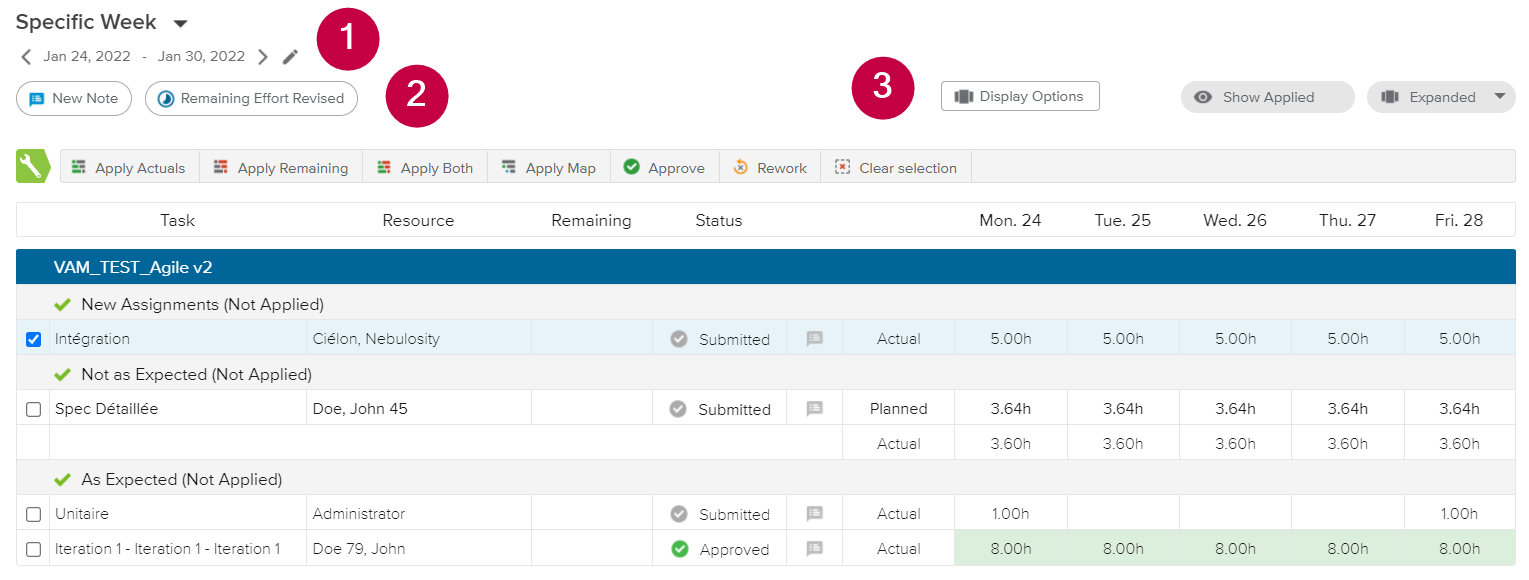
Time Frame Selection – Allows the user to select the Timesheets Time Frame.
Filtering options – Allows the user to only display specific Timesheets.
Display options – Allows the user to display or not display more detailed Timesheet information.
When the view is expanded, the Outstanding Timesheets in the past alert can be displayed indicating some Timesheets from the past have to be dealt with.
The Time Frame selection pick-list allows the user to select a time frame for the Timesheets from among the following: “Current Week”, “Previous Week”, “Specific Week”, “Current Month”, “Previous Month”, “Specific Month”, and “Custom”.
For all the aforementioned options except “Custom”, the user has the ability to navigate between time frames by clicking on the Previous () and Next () buttons.
Upon choosing the “Specific Week” or “Specific Month” options, the user will be prompted to choose a date; the resulting time frame will be the corresponding week or month containing the date selected.
Once a specific Time Frame is selected, the user can click on the Edit () button to modify it.
Upon choosing the “Custom” option, the user will be prompted to choose a Start and Finish date for the desired time frame.
The time-distributed intervals displayed will be conditioned by the selected dates as follows:
When the Finish date is set up to 12 days after the Start date, the intervals displayed will be in days,
When the Finish date is set between 13 days and 12 weeks after the Start date, the intervals displayed will be in weeks,
When the Finish date is set between 13 weeks and 12 months after the Start date, the intervals will be displayed in months,
When the Finish date is set 13 months or more after the Start date, the intervals will be displayed in years.
Once a custom Time Frame is selected, the user can click on the Edit () button to modify it.
The following filtering options are available:
| New Notes | Only displays the Timesheets wherein a new Note has been entered. Upon clicking on the Notes button, the Timesheet Daily Notes popup is displayed. For the By Tasks view mode, this option is only available if the Display Option is Expanded. |
| Remaining Effort Revised | Only displays the Timesheets wherein the Team Member has entered a new Remaining Effort. For the By Tasks view mode, this option is only available if the Display Option is Expanded. |
| Corrections | Only displays the Timesheets wherein some corrections have been entered. For the By Tasks view mode, this option is only available if the Display Option is Collapsed. |
The following display options are available:
| Show Applied | Allows the user to display or hide Timesheets whose Status is “Applied”. |
| Display | Allows the user to select one of the following display:
|
Display Options | Upon clicking on the Display Options button, the Display Options pop-up appears enabling users to set up two options:
This command is only available for the By Tasks View Mode. |
The Timesheets Overview By Tasks enables Project Managers to manage their Project timesheets By Tasks.
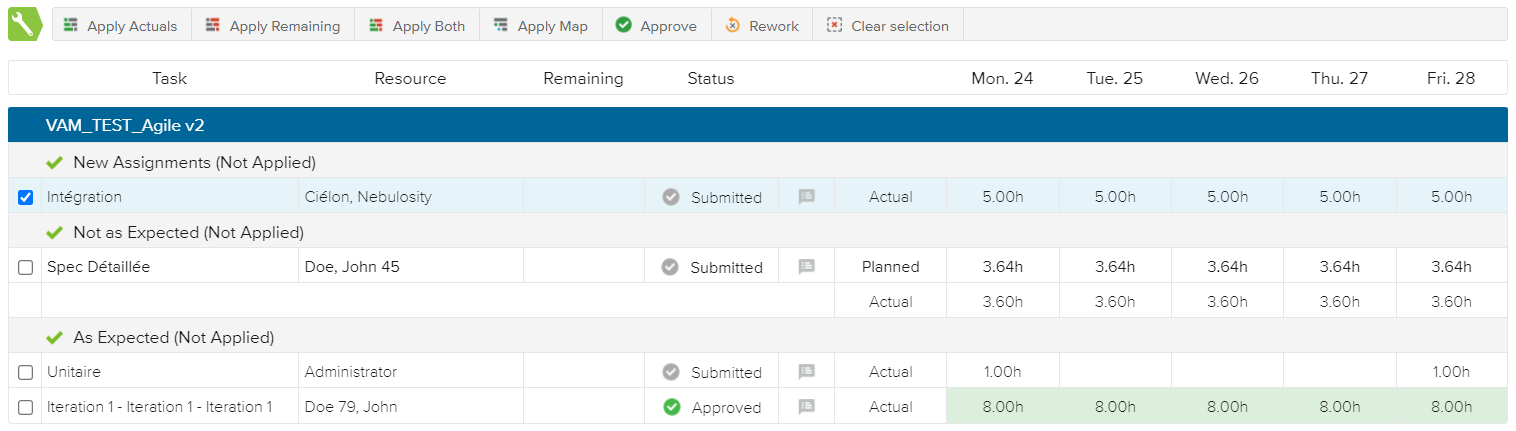
Upon selecting a Task the following commands are displayed:
Approve – Allows the Project Manager to indicate that he/she accepts the submitted data.
Rework – Sends back the submitted data to the appropriate Team Member for modification.
Apply Actuals – Applies the submitted Actual Effort to the selected Project Tasks.
Apply Remaining – Applies the submitted Remaining Effort to the selected Project Tasks.
Apply Both – Applies the submitted Actual Effort and Remaining Effort to the selected Project Tasks.
It is also possible to perform bulk actions on all tasks of the same section by clicking on the section's name. In doing so, all tasks in the section will be selected at once.

Each Timesheet provides the following information: Task Name, Resource Name, Remaining Effort, Status, as well as Actual and Planned Effort.
Depending on the option selected in the Display Options popup, the Remaining Effort value can come either from the Timesheet or the Labor Assignment.
In addition, the following alert can be displayed:
| New Notes | Indicates that at least one Note has been entered. |