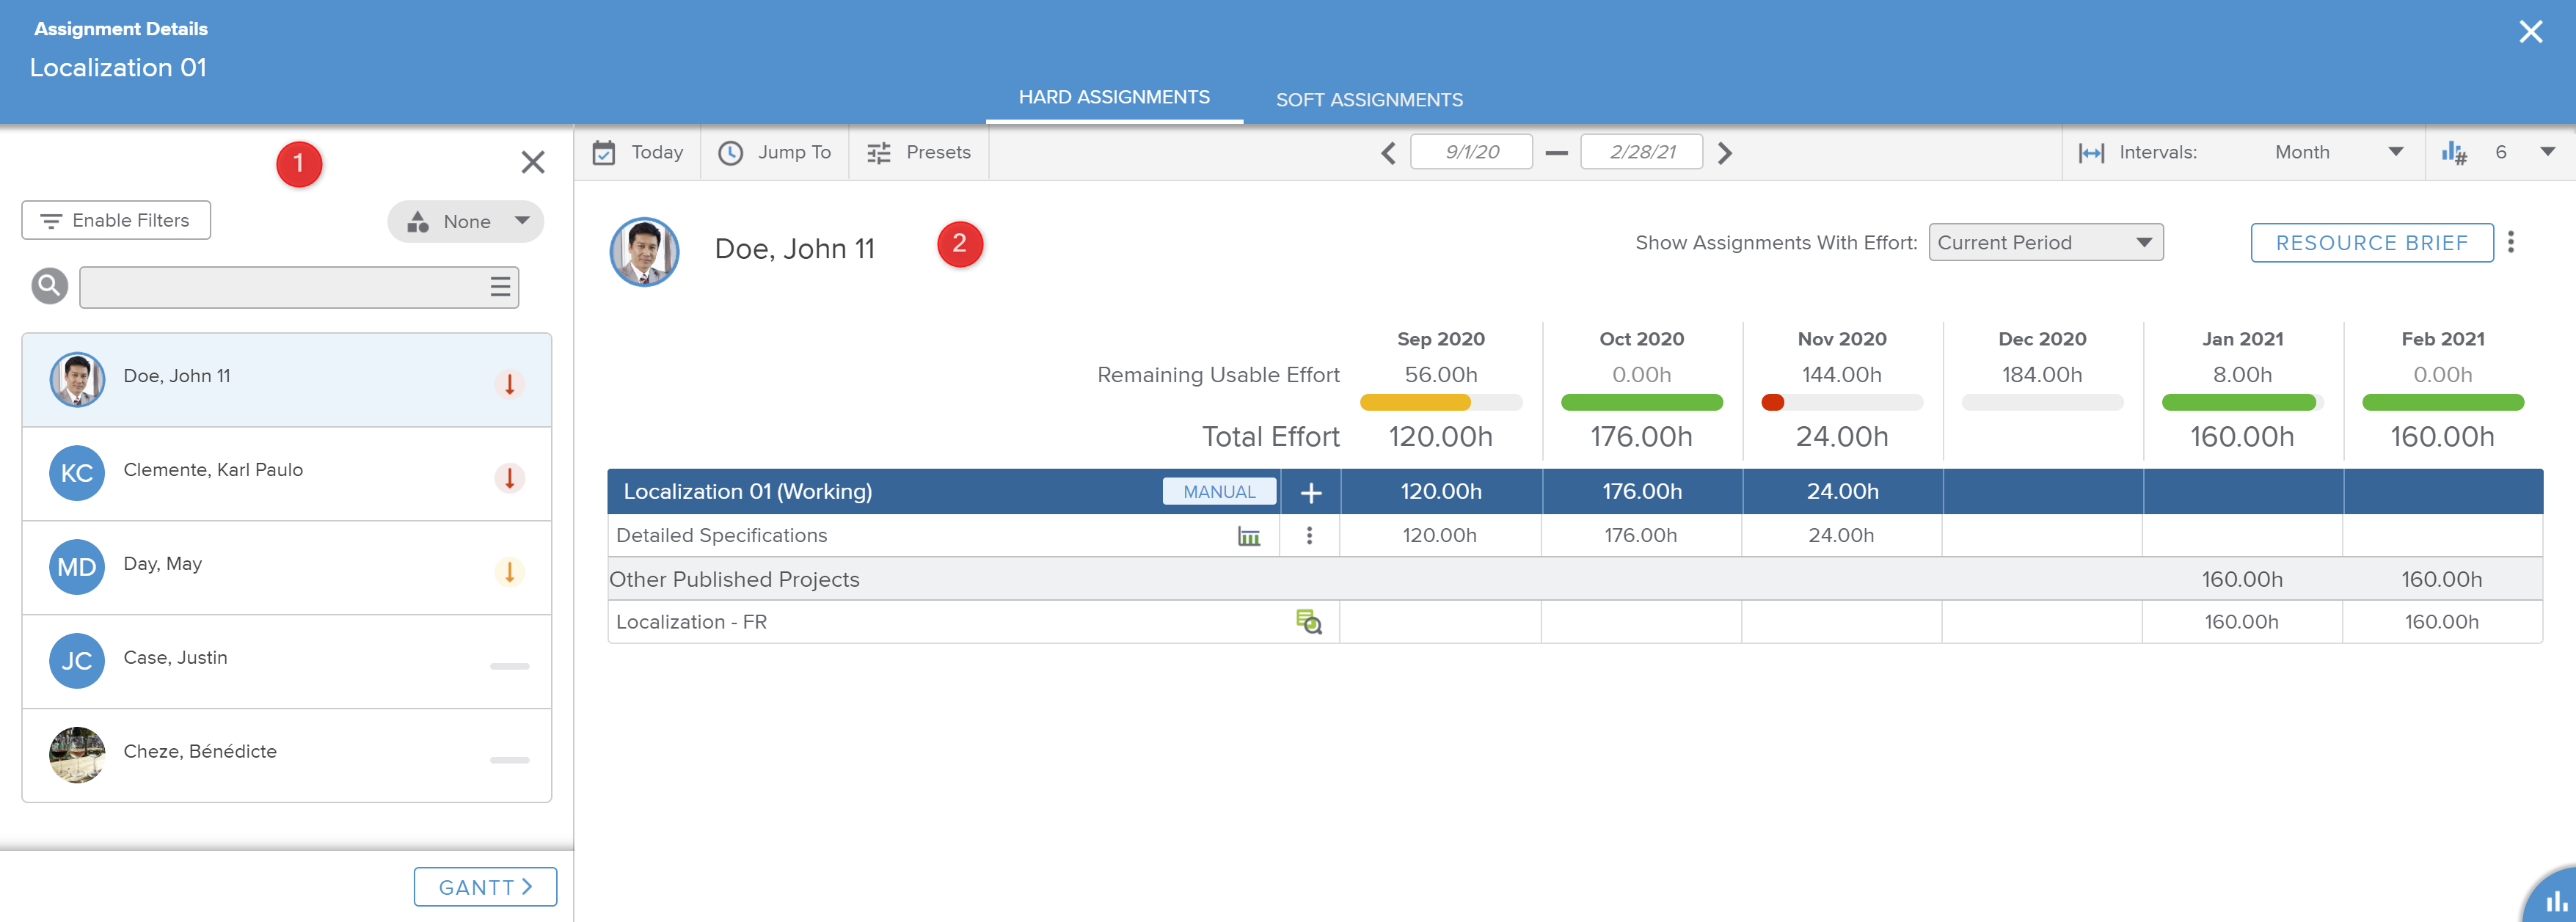
The Hard Assignments Details tab is made up of two sections:
The Resources List panel, from which the user can select the resource whose utilization is to be reviewed
The Utilization view, which allows the user to see the detailed utilization of the selected resource.
The Resources List panel displays the list of resources belonging to the selected project.
The Resources List panel can be displayed or hidden using the following buttons:
 | Show | Allows the user to display the panel. |
 | Close | Allows the user to hide the panel. |
Upon clicking on the Gantt button located in the bottom section of the panel (only in single project selection), the Focus view, Work tab, Gantt sub-tab is displayed.

Upon accessing the Filters popup, the following filtering fields are available (depending on the view selected):
Organizations | Opens a list of Organizations from which the user can select one or several organizations. Upon making the selection(s), only resources belonging to the selected organizations will be displayed in the spreadsheet. |
Job Classifications | Opens a list of Job Classifications from which the user can make one or several selections. Upon making the selection(s), only the resources with the corresponding Job Classification will be displayed in the spreadsheet. |
Skills | Opens a list of Skills from which the user can make one or several selections. Upon making the selection(s), only resources with the corresponding Skills will be displayed in the spreadsheet. |
Contract Type | Allows the user to only display Resources whose Contract Type is "External" or "Internal". |
Resources | Allows the user to filter the view to only display the selected Resources. |
Show Inactive Resources | Allows the user to filter the view to display resources whose Status is “Inactive”. |
Team Origin | Opens a pick-list of Team Origin from which the user can make one or several selections. Upon making the selection(s), only the corresponding resources will be displayed in the spreadsheet. By default, all the Project Team Members are listed. |
Show Only Resources with overallocation within one interval | Allows the user to display only resources that are overallocated in at least one time interval during the selected time period. |
Show Only Resources with underallocation within one interval | Allows the user to display only resources that are underallocated in at least one time interval during the selected time period. |
Display Resources | Allows the user to display Resources depending on whether or not they have some "Effort" values in the selected time period. |
Display Assignments | Allows the user to display Soft Assignments depending on whether or not they have some "Effort" values in the selected time period. |
Show Parent Tasks | Allows the user to display the Task hierarchy. |


Each Resource is displayed in the form of a card that features the Resource’s name and picture.
In addition, colored indicators are provided to highlight the shift between the Total Effort and Usable Effort values.
The colored indicators take into account the displayed time intervals. If more than one time interval triggers an alert, the indicators in the left panel will display as follows:
“Over target” will be displayed over “Under target”.
“Significantly over target” will be displayed over “Significantly under target”.
“Significantly under target” will be displayed over “Over target”.
“Significantly over target” will be displayed over “Over target”, and “Significantly under target” will be displayed over “Under target”.
The user can access the legend for the colored indicators by clicking on the Legend ( ) button located in the bottom right corner of the view.
Colored indicators are defined by the Administrator in the System Settings workspace, General Settings folder, Colored Indicators tab, Resource Utilization Preferences.
The upper section of the view displays the selected resource’s name.
In addition, the following tools are available here:
Show Assignments with Effort | Allows the user to choose which assignments with effort should be displayed in the Utilization Details spreadsheet (i.e., only the ones for the current period, the ones with effort in the previous and next period, or the assignments with effort in all periods). | |
Resource Brief | Opens the corresponding Resource Brief dialog box. | |
 | More | Provides access to the following commands:
|
For each displayed time interval, a progress bar is shown, allowing the user to review the Resource’s Remaining Usable Effort (or Available Effort when the view is accessed in multiple project selection).

The progress bar’s color highlights the shift between the resources Total Effort and Usable Effort (or Available Effort). The user can access the legend for the colored indicators by clicking on the Legend () button located in the bottom right corner of the view.
Colored indicators are defined by the Administrator in the System Settings workspace, General Settings folder, Colored Indicators tab, Resource Utilization Preferences.
The Utilization Details spreadsheet displays the selected resource's assignments. When the view is accessed in multiple project selection, these assignments will be grouped by project.
At the project level, the user can interact with the view in the following ways:
Clicking on the project Name displays the corresponding Project Brief dialog box.
Clicking on the Origin chip, which indicates how the resource has been added to the Project Team (either manually or through a Resource Acquisition Capability), opens the corresponding Team Member Details dialog box.
Clicking on the white Add (
 ) button allows the user to create a new assignment. Upon doing so, he/she is then prompted to select a task.
In addition, clicking on the More () button of a Task row displays the following commands:
Scroll Into View | Modifies the time period so that the first date when the Effort > 0 for the assignment is displayed. |
Edit Task | Opens the Task Details dialog box. |
Edit Assignment | Opens the Labor Assignment dialog box, allowing the user to modify the assignment attributes. |
Replace Resource | Opens the Replace Resource dialog box, where the user can choose a new resource to assign instead of the current one. |
Delete Assignment | Deletes the corresponding Hard Assignment. |
The Origin of Allocated, Committed, and Dedicated resources is displayed differently depending on the situation:
 | Blue | Indicates that the resource is “active” (the allocation Finish Date is in the future). |
 | Grey | Indicates that the resource is “inactive” (the allocation Finish Date is in the past). |
In addition, the user can define whether an assignment should be uniform or non-uniform:
 | Uniform | Indicates that only uniform assignment is allowed. Upon clicking on it, the assignment allows non-uniform assignment. |
 | Non Uniform | Indicates that non-uniform assignment is allowed. Upon clicking on it, the assignment only allows uniform assignment. |

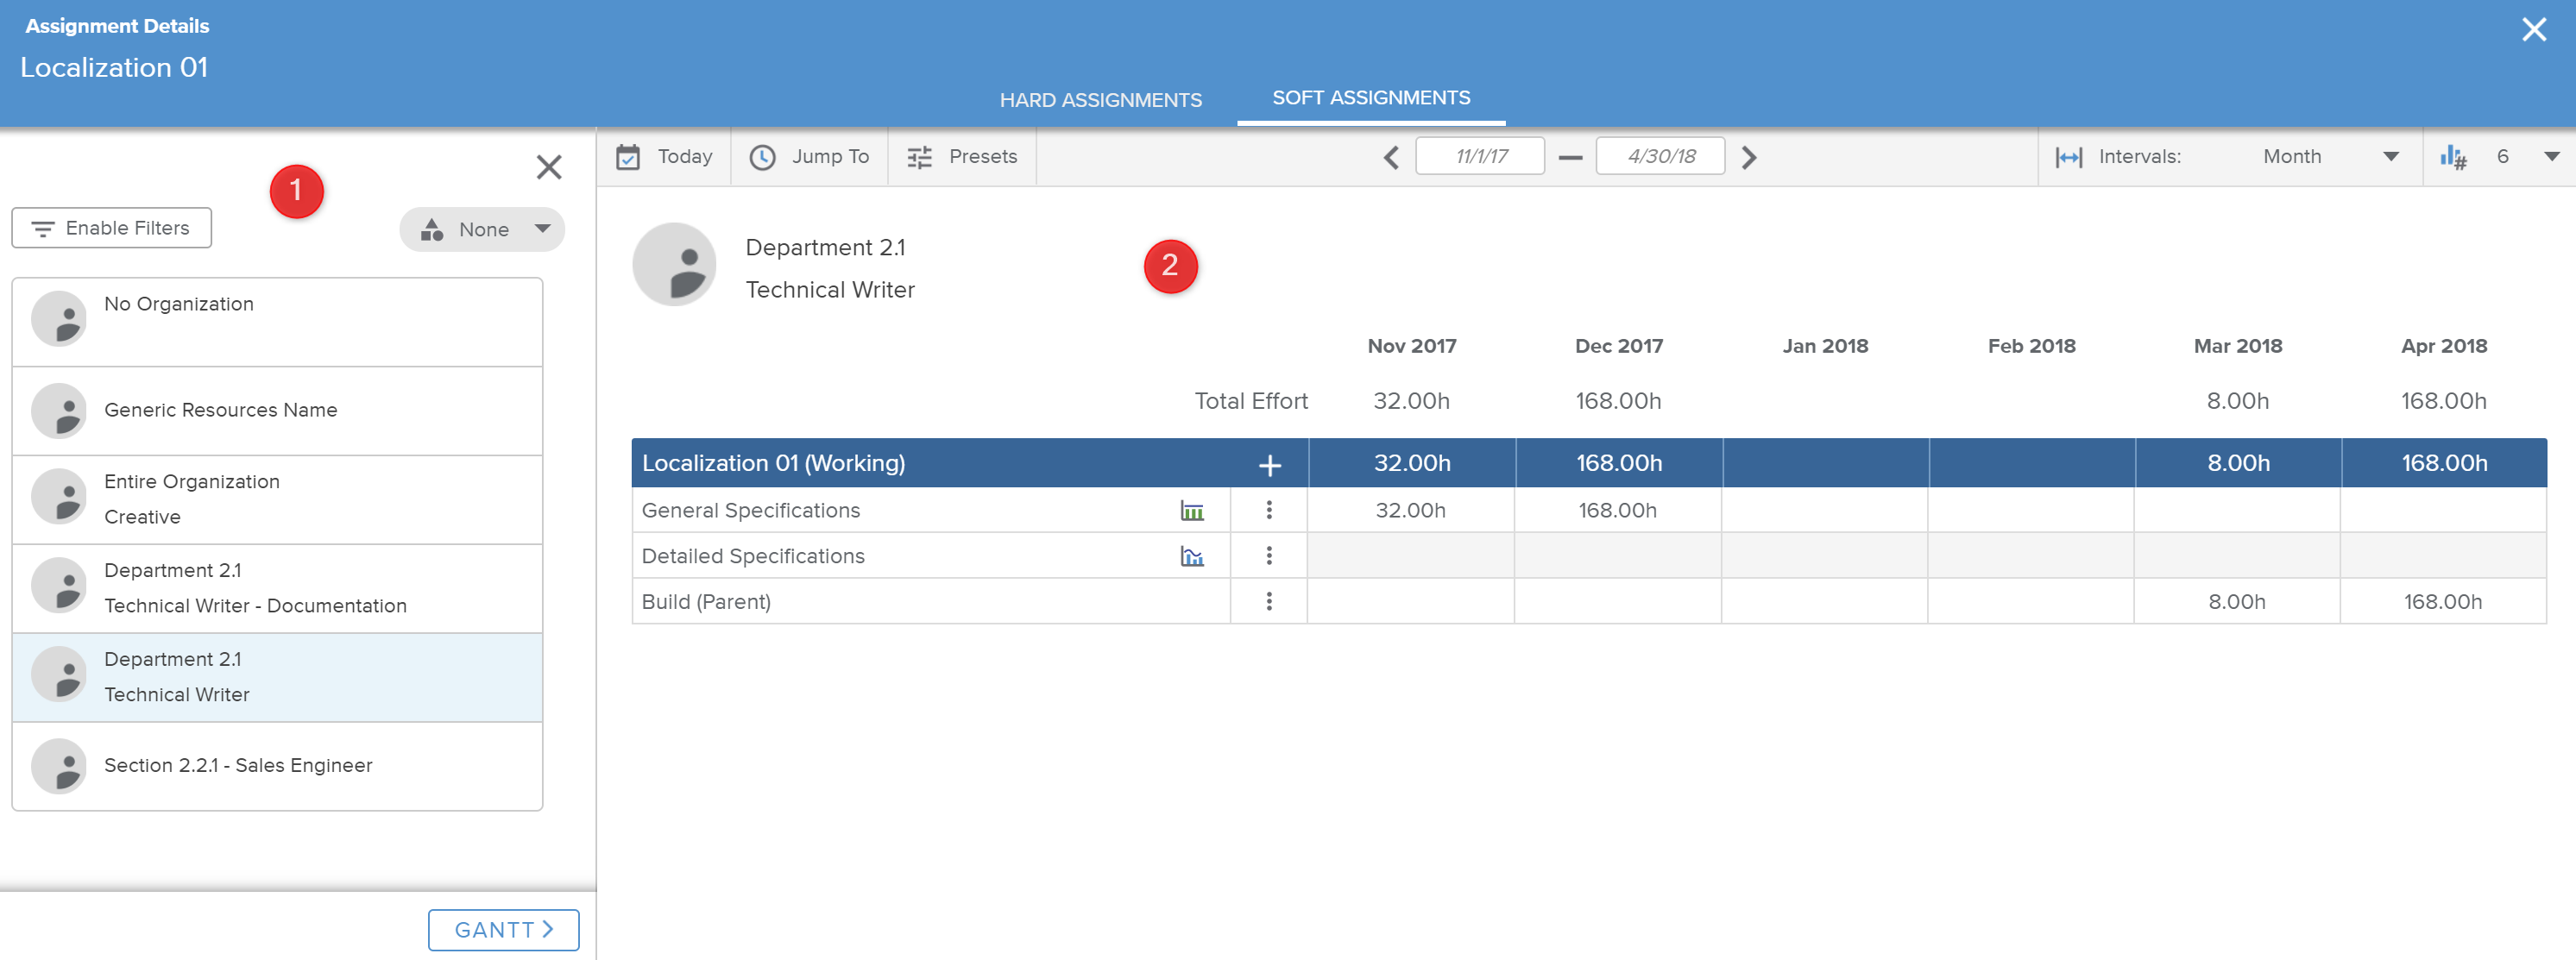
The Soft Assignments Details tab is made up of two sections:
The Soft Assignments List panel, from which the user can select the assignments whose allocation is to be reviewed.
The Utilization view, which allows the user to see the detailed allocation of the selected assignment.
The Soft Assignments List panel displays the list of the selected projects’ soft assignments.
The Soft Assignments List panel can be displayed or hidden using the following buttons:
| Show | Allows the user to display the panel. |
| Close | Allows the user to hide the panel. |
Upon clicking on the Gantt button located in the bottom section of the panel (only in single project selection), the Focus view, Work tab, Gantt sub-tab is displayed.
Upon accessing the Filters popup, the following filtering fields are available:
Organizations | Opens a list of Organizations from which the user can select one or several organizations. Upon making the selection(s), only resources belonging to the selected organizations will be displayed in the list. |
Job Classifications | Opens a list of Job Classifications from which the user can make one or several selections. Upon making the selection(s), only the resources with the corresponding Job Classification will be displayed in the list. |
Skills | Opens a list of Skills from which the user can make one or several selections. Upon making the selection(s), only resources with the corresponding Skills will be displayed in the list. |
Each soft assignment is displayed in the form of a card that features the assignment’s Organization, Job Classification, and Skills (if any). When a combination of Organization, Job Classification, and Skills matches a Generic Resource, then the Generic Resource’s Name will be displayed.
The upper section of the view displays the selected soft assignment’s Organization, Job Classification, and Skills (if any). When a combination of Organization, Job Classification, and Skills matches a Generic Resource, then the Generic Resource’s Name will be displayed.
The Assignment Details spreadsheet displays the selected soft assignment’s allocations. When the view is accessed in multiple project selection, these assignments will be grouped by project.
At the project level, the user can interact with the view in the following ways:
Clicking on the project Name displays the corresponding Project Brief dialog box.
Clicking on the white Add (
) button allows the user to create a new soft assignment. Upon doing so, he/she is then prompted to select a task.
In addition, clicking on the More () button of a Task row displays the following commands:
Scroll Into View | Modifies the time period so that the first date when the Effort > 0 for the assignment is displayed. This option is only available when the Show Distribution switch button is activated. |
Edit Task | Opens the Task Details dialog box. |
Edit Assignment | Opens the Labor Assignment dialog box, allowing the user to modify the assignment attributes. |
Fulfill Assignment | Opens the Fulfill Soft Assignment dialog box, allowing the user to choose the nominative resource(s) to assign. |
Delete Assignment | Deletes the corresponding Soft Assignment. |
Convert into Request | Opens the Create Allocation Request dialog box, which allows the user to request a Resource for the Soft Assignment. |
In addition, the user can define whether an assignment should be uniform or non-uniform:
| Uniform | Indicates that only uniform assignment is allowed. Upon clicking on it, the assignment allows non-uniform assignment. |
| Non Uniform | Indicates that non-uniform assignment is allowed. Upon clicking on it, the assignment only allows uniform assignment. |
The Matching Resources section provides the list of Team Members whose combination of Organization, Job Classification, and Skills attributes matches the selected soft assignment attributes.

Upon clicking on the Details button located next to the Resource's Name, the view switches to the Hard Assignments Details tab, with the corresponding resource selected.