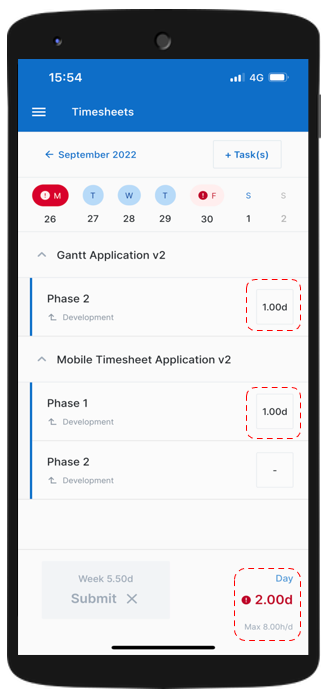
The main purpose of this application is to allow Team Members to report the amount of time they have actually worked on the tasks they were assigned to (or on tasks that they were not originally assigned to).
Depending on the options selected by the Administrator in the System Settings workspace and the Time Tracking view of the Designer, features or displayed information can differ from one system to another. Certain Settings may impact the Timesheets Mobile Application.
The Timesheets Mobile Application is compatible with all smartphones.
The Application can be downloaded from the Application Store of your smartphone (e.g. Apple Store, Google Play Store, etc.).
Once you have installed the Timesheets Mobile Application, you will be able to log in.
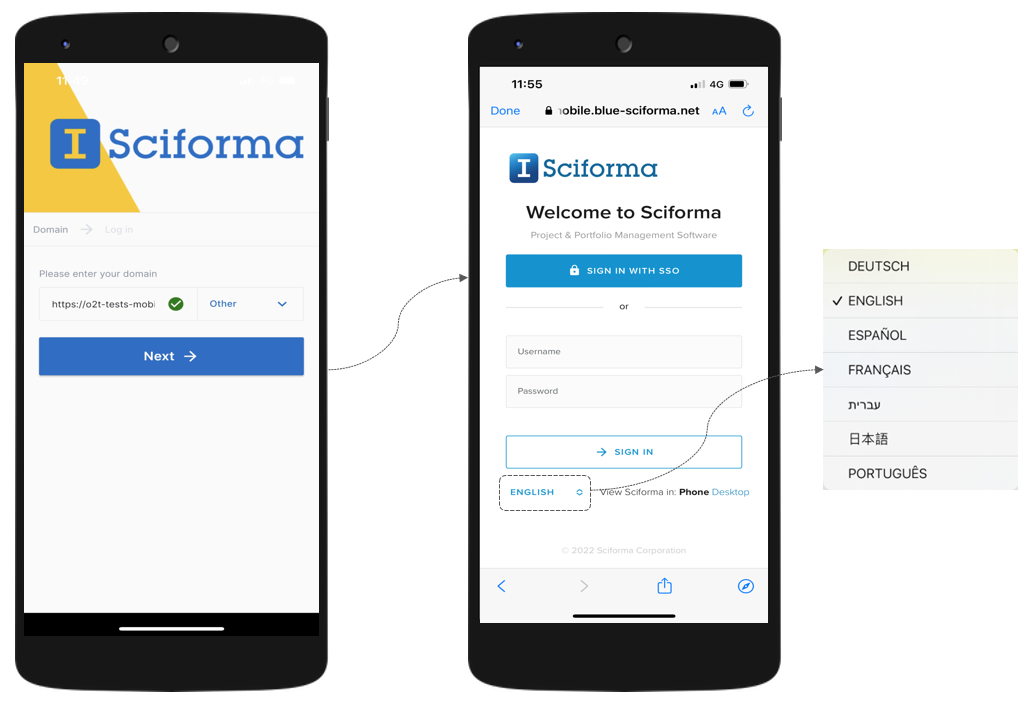
Enter your domain, then tap the Next button.
NoteThis action only have to be done the first time you connect to the application.
Sign in with SSO (Single Sign On) or by entering your credentials.
Select your language.
Tap the Sign in button.
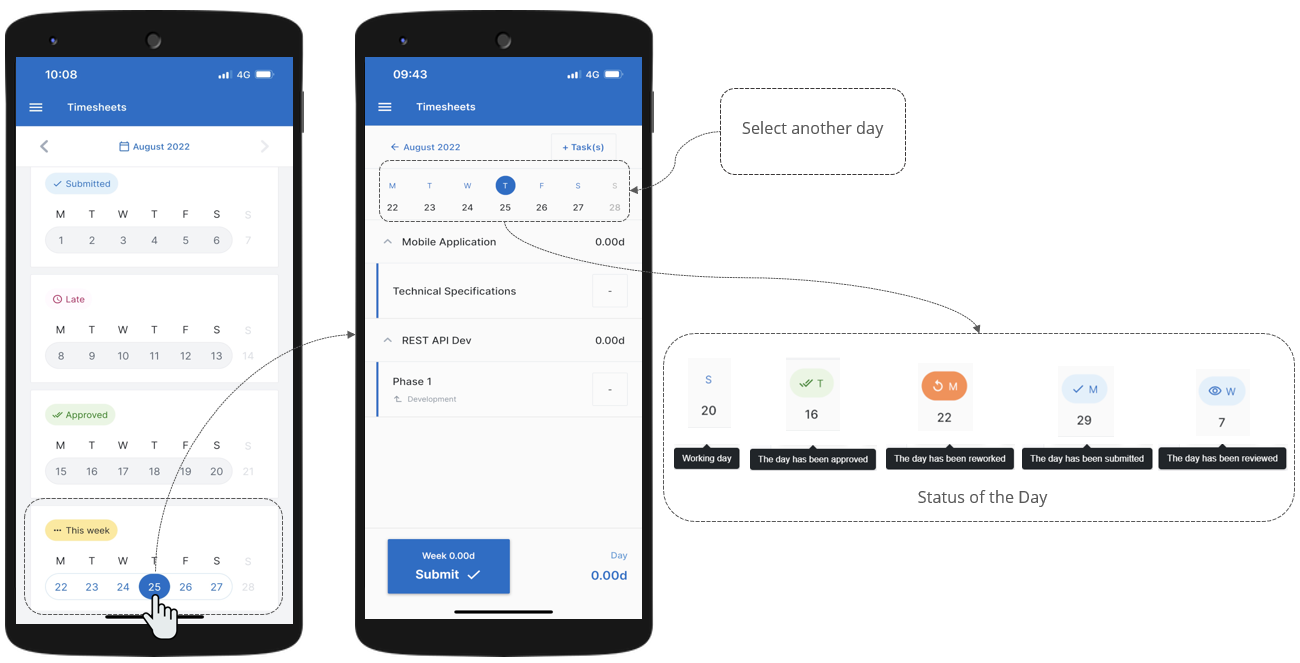
Once logged in, you will directly access the Timesheet cards view for the current month.
You can select other months using the ( ) (
) ( ) arrows.
The Timesheet cards view displays the Timesheet cards ( i.e. one Timesheet card per week.) for the selected month.
Each Timesheet card comes with one of the following statuses:
This week – Actuals have been or need to be entered, moving the Timesheet from a non-working (inactive) phase to a working (active) phase.
Submitted – A Submit command has been executed, submitting the Actuals to the Resource Manager and/or the Project Manager.
Reviewed – Submitted Actuals have been reviewed. This Status is only available when a Timesheet has been reviewed by the Resource Manager.
Approved – Submitted/Reviewed Actuals were approved. This Status is only available when a Timesheet has been approved by the Project Manager.
Rework week – Submitted Actuals were not accepted and sent back by the Resource Manager or the Project Manager to Team Members for rework.
Submitting Timesheets blocks any changes that can be made to Timesheet unless:
The Team Member recalls his/her Timesheet.
The Resource Manager or Project Manager asks for a revision.
The Week Timesheet view enables you to navigate in the Timesheet for the selected time frame from one day to another and displays the tasks you have been assigned to on the selected day.
Upon tapping a Timesheet card in the Timesheet cards view, the Week Timesheet view will be displayed for the first day of the week.
Tapping a specific day on a Timesheet card, will display the Week Timesheet view for that selected day.
Each day comes with one of the following statuses:
Working – Actuals have been or need to be entered, moving the Timesheet from a non-working (inactive) phase to a working (active) phase.
Approved – Submitted/Reviewed Actuals were approved. This Status is only available when a Timesheet has been approved by the Project Manager.
Rework – Submitted Actuals were not accepted and sent back by the Resource Manager or the Project Manager to Team Members for rework.
Submitted – A Submit command has been executed, submitting the Actuals to the Resource Manager and/or the Project Manager.
Reviewed – Submitted Actuals have been reviewed. This Status is only available when a Timesheet has been reviewed by the Resource Manager.
The Week Timesheet view displays all the tasks which you have been assigned on for the selected day.
If you have worked on a task which was not planned, you can assign yourself to it.
Sciforma provides the ability to auto-assign resources on non-project related tasks so that users can submit complete Timesheets to include time off for vacation, sickness, etc.
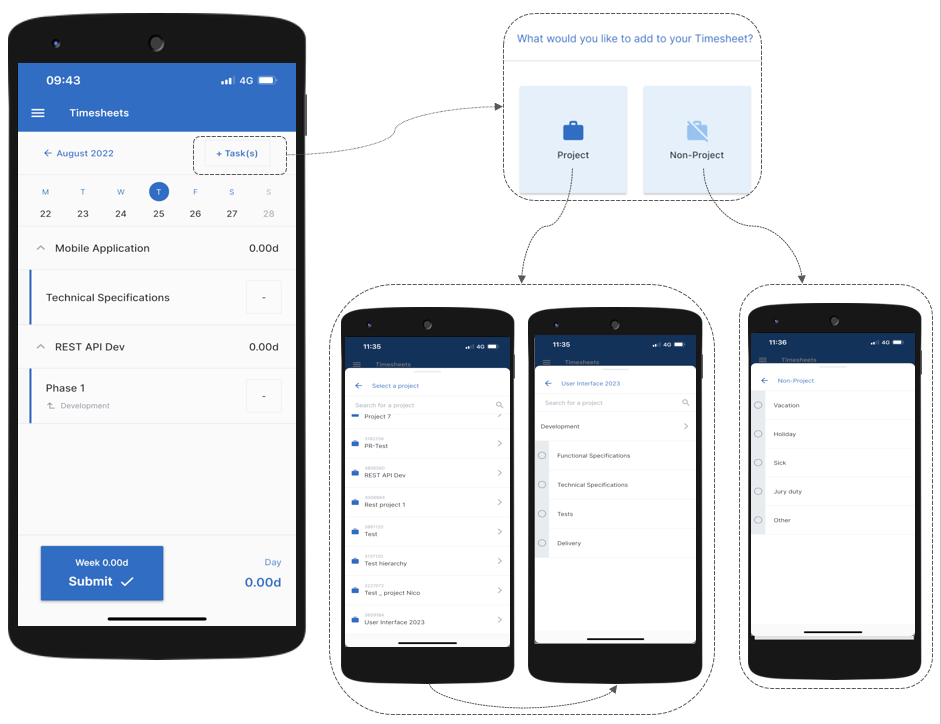
To add some new tasks:
Tap the + Task(s) button.
You will be prompted to chose the kind of tasks you would like to add.
Tap the Project button to open the Projects list. By tapping on the desired project, the list switches to the corresponding project’s Tasks list. Tap on a Task's name to add the task directly to the Timesheet, or select several tasks by ticking the corresponding checkboxes, and tap the Add task(s) to this week button.
NoteAssignments are only possible on Published Project Tasks.
Tap the Non-Project button to open the Non-Project related tasks list (e.g. Vacation, Sickness, Jury Duty, etc.). Tap on a Task's name to add the task directly to the Timesheet, or select several tasks by ticking the corresponding checkboxes, and tap the Add task(s) to this week button. The selected task(s) will be added to the Timesheet in a section named “Non-Project”.
NoteTasks available in the Non-Project project are created by the Administrator.
For tasks which you have been assigned to, a blue clock ( ) will be displayed on the bottom right hand side of Actual Effort cells.
In order to enter some Actual Effort:
Tap the cell of the task for which you want to enter some Actual Effort.
Select a value via the Duration picker.
Tap the OK button, or select other tasks by using the (
 ) (
) ( ) arrows.
In order to apply the Planned Effort
Tap the cell containing the blue clock for the task for which you want to apply the Planned Effort.
Tap the Apply Planned button.
Once you have tapped on the Apply Planned button, the bottom of the screen closes automatically and the cell is automatically filled with the planned value.
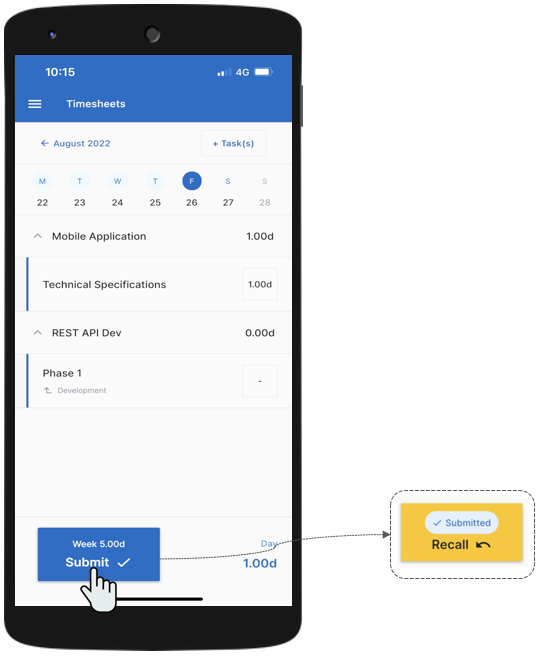
Once all Actual Effort has been entered, you will be able to submit your timesheet by tapping the Submit button.
Depending on the options set by the Administrator in the System Settings workspace, a Recall command may be displayed, enabling Team Members to recall their Timesheet to apply some changes.
Submitting Timesheets blocks any changes that can be made to the Timesheet unless the Resource Manager or Project Manager asks for a revision, or the Team Member taps the Recall button.
Administrators are able to assign Time Entry Rules to Resources. It will determine the rules that resources will have to follow when entering their actuals in their timesheets.
Rules will be enforced meaning that warning messages will be displayed when a rule is violated, and it will not be possible to submit the Timesheet unless the issues are corrected.
Time Entry Rules are set in the Designer Time Tracking view.
Sometimes Actual Effort values submitted for a task are not accepted by the Resource Manager or the Project Manager and are returned for rework to the Team Member.
When sending back a Timesheet, the Resource Manager or the Project Manager will be able to write a comment to his/her Team Member.
This Rework Comment will be displayed in the Timesheet cards view and in the Week Timesheet view.
In the Week Timesheet view, Rework Comments will be displayed under the Time line when they have been entered by the Resource Manager and under the Project's name when they been entered by the Project Manager.

