Take a tour of all workspaces and views related to this topic.
The main purpose of this workspace is to allow Team Members to report the amount of time they have actually worked on the tasks they were assigned to (or on tasks that they were not originally assigned to).
Depending on the options selected by the Administrator in the System Settings workspace, features or displayed information can differ from one system to another.

The Timesheet workspace is made up of different sections:
The Timesheet cards panel displays the Timesheet cards ( i.e. one Timesheet card per week.) for the selected month.
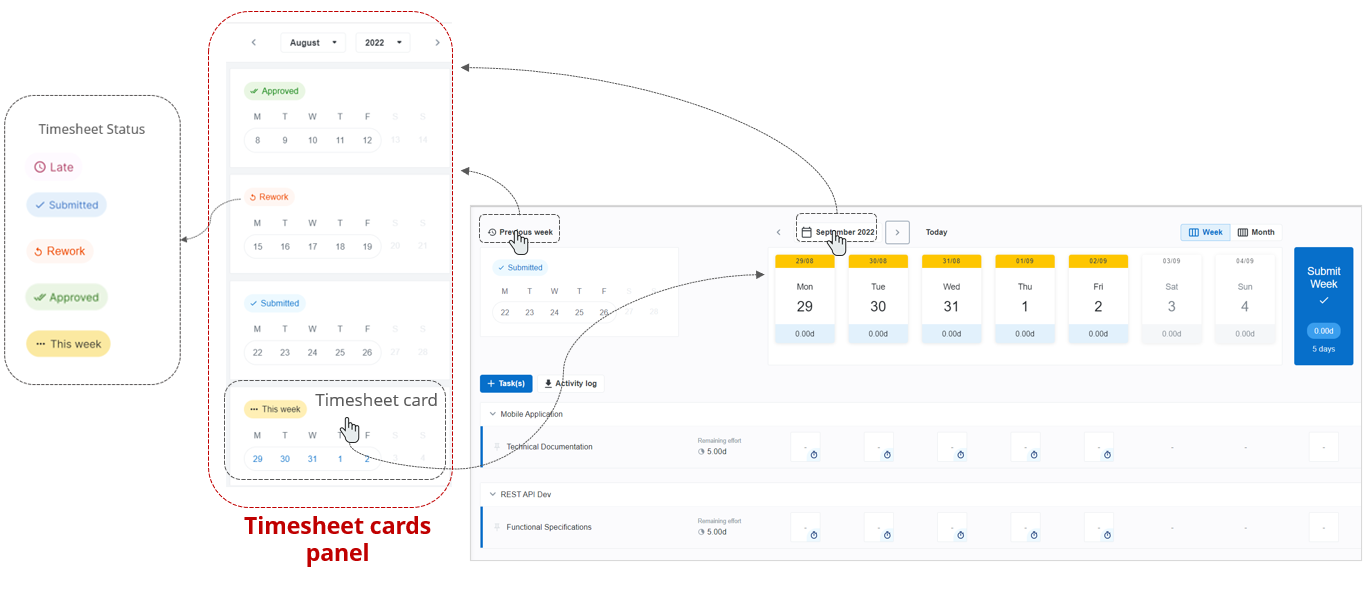
Each Timesheet card comes with one of the following statuses:
This week – Actuals have been or need to be entered, moving the Timesheet from a non-working (inactive) phase to a working (active) phase.
Submitted – A Submit command has been executed, submitting the Actuals to the Resource Manager and/or the Project Manager.
Reviewed – Submitted Actuals have been reviewed. This Status is only available when a Timesheet has been reviewed by the Resource Manager.
Approved – Submitted/Reviewed Actuals were approved. This Status is only available when a Timesheet has been approved by the Project Manager.
Rework – Submitted Actuals were not accepted and sent back by the Resource Manager or the Project Manager to Team Members for rework.
Clicking on a Timesheet card in the Timesheet cards panel will display the Timesheet of the selected week in the Time Navigation panel.
Depending on the Intervals and Zoom options selected by the Administrator in the System Settings, the Time Navigation panel can come with two view modes:
Week view mode
Month view mode
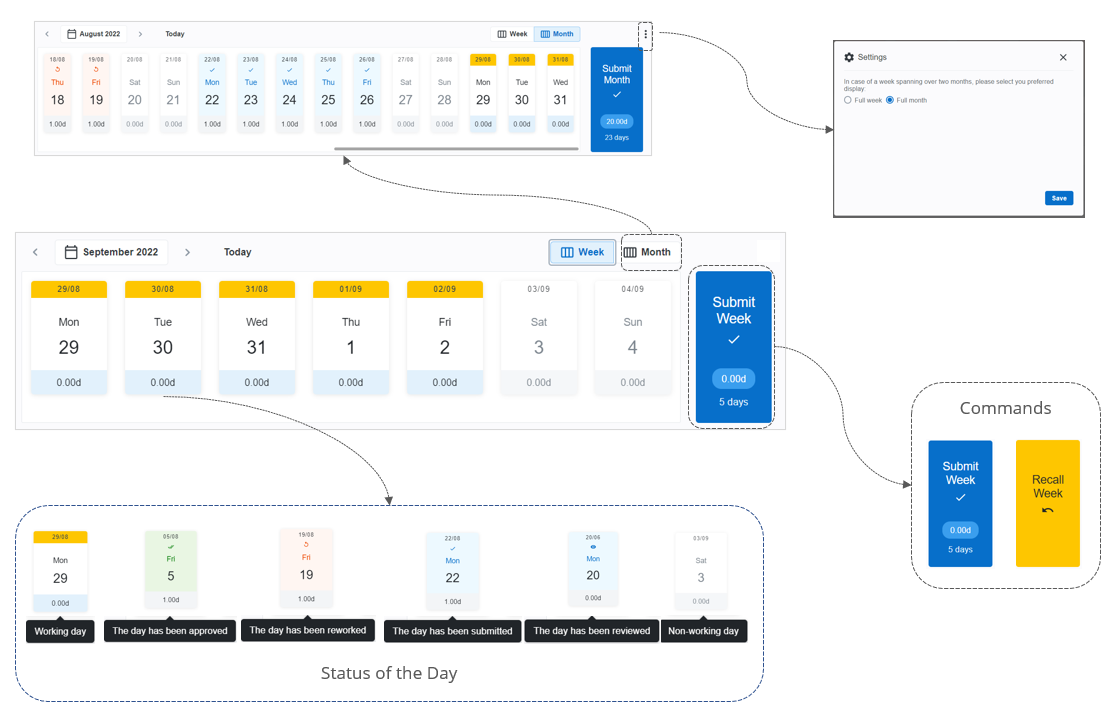
In Month view mode, in case of a week spanning over two months, you will be able to chose your preferred display by clicking on the More ( ) button.
This setting is enabled by the Administrator in the System Settings workspace.
Each day comes with one of the following statuses:
Working – Actuals have been or need to be entered, moving the Timesheet from a non-working (inactive) phase to a working (active) phase.
Approved – Submitted/Reviewed Actuals were approved. This Status is only available when a Timesheet has been approved by the Project Manager.
Rework – Submitted Actuals were not accepted and sent back by the Resource Manager or the Project Manager to Team Members for rework.
Submitted – A Submit command has been executed, submitting the Actuals to the Resource Manager and/or the Project Manager.
Reviewed – Submitted Actuals have been reviewed. This Status is only available when a Timesheet has been reviewed by the Resource Manager.
Once all Actual Effort has been entered, you will be able to submit your timesheet by clicking on the Submit button.
The availability of the Submit button when the Week or Month view modes are displayed depends on a setting set by the Administrator in the System Settings workspace.
Depending on the options set by the Administrator in the System Settings workspace, a Recall command may be displayed, enabling Team Members to recall their Timesheet to apply some changes.
Submitting Timesheets blocks any changes that can be made to the Timesheet unless the Resource Manager or Project Manager asks for a revision, or the Team Member clicks on the Recall button.
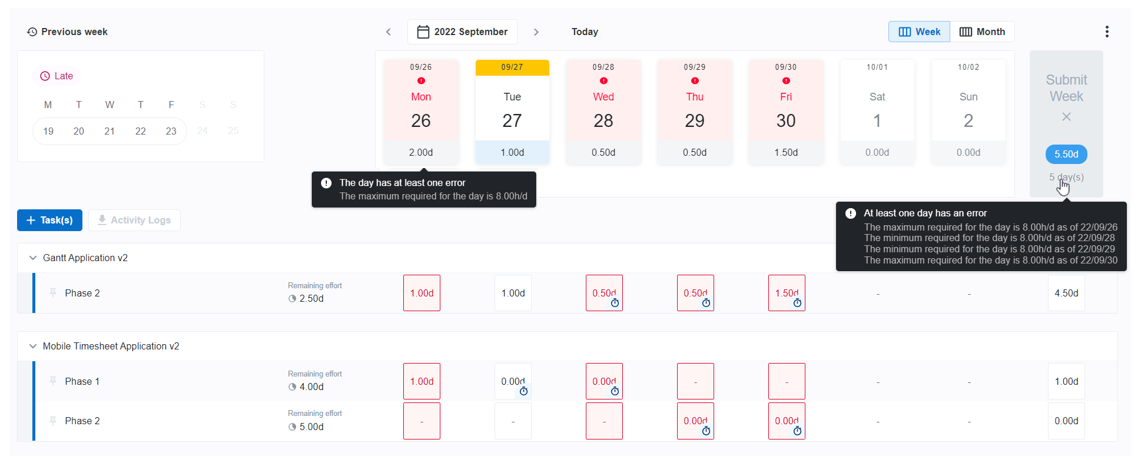
Administrators are able to assign Time Entry Rules to Resources. It will determine the rules that resources will have to follow when entering their actuals in their timesheets.
Rules will be enforced meaning that warning messages will be displayed when a rule is violated, and it will not be possible to submit the Timesheet unless the issues are corrected.
Time Entry Rules are set in the Designer Time Tracking view.
Enforced Rules
In the Tasks panel, you will be able to enter their Actual Effort, update their Remaining Effort, and import Activity logs.
By default, all tasks you have been assigned to for the selected time frame are displayed. They are grouped by Project.
Each task comes with one of the following statuses:
Working – Actuals have been or need to be entered, moving the Timesheet from a non-working (inactive) phase to a working (active) phase.
Approved – Submitted/Reviewed Actuals were approved. This Status is only available when a Timesheet has been approved by the Project Manager.
Rework – Submitted Actuals were not accepted and sent back by the Resource Manager or the Project Manager to Team Members for rework.
Submitted – A Submit command has been executed, submitting the Actuals to the Resource Manager and/or the Project Manager.
The following tools are also provided:
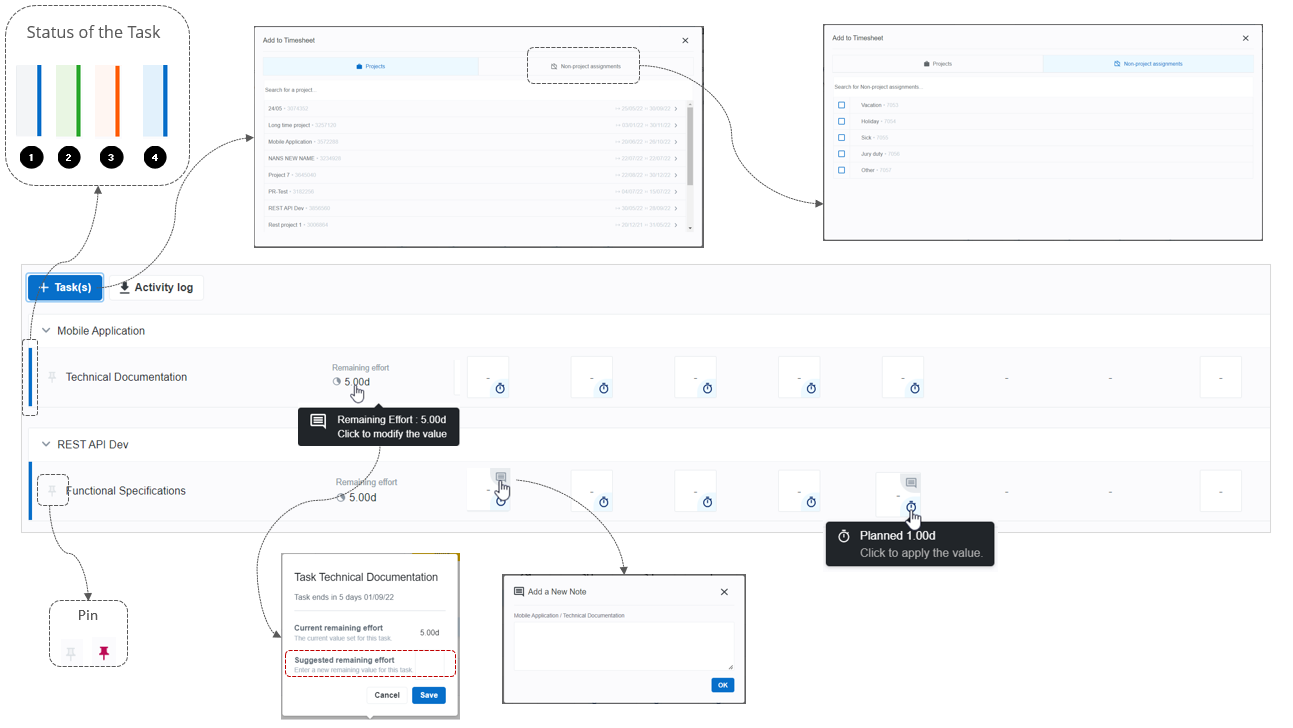
 | Pin | Enables to pin tasks, so that they will always be displayed in the Tasks panel, even when you are not assigned to the task. |
 | Notes | Enables you to enter Notes. The Notes icon is available when hovering on the top right hand side of the Actual Effort cell. |
The Tasks panel displays all tasks which you have been assigned on for the selected Time frame in the Time Navigation panel.
If you have worked on a task which was not planned, you can assign yourself to it.
Sciforma provides the ability to auto-assign resources on non-project related tasks so that users can submit complete Timesheets to include time off for vacation, sickness, etc.
To add some new tasks:
Click on the +Task(s) button.
In the Add to Timesheet popup, you will be prompted to chose the kind of task(s) you would like to add.
Click on Projects to open the Projects list. By clicking on the desired project, the list switches to the corresponding project’s Tasks list. Click on a Task's name to add the task directly to the Timesheet, or select several tasks by ticking the corresponding checkboxes, and click on the Add task(s) to the Timesheet button.
NoteAssignments are only possible on Published Project Tasks.
Click on the Non-project assignments button to open the Non-Project related tasks list (e.g. Vacation, Sickness, Jury Duty, etc.). Click on a Task's name to add the task directly to the Timesheet, or select several tasks by ticking the corresponding checkboxes, and click on the Add task(s) to the Timesheet button. The selected task(s) will be added to the Timesheet in a section named “Non-Project”.
NoteTasks available in the Non-Project project are created by the Administrator.
The tasks closed by the Project Managers will behave as follows:
Closed tasks assignments with at least one non-zero Actual Hours value in the selected period will be displayed.
Closed tasks assignments with only zero Actual Hours values will be removed from the timesheet view regardless of whether there are planned hours or not.
Closed tasks will always be hidden when using the Add Assignment.
Closed tasks and tasks from closed projects will always be marked as “(Closed)” in the Tasks panel and will be read only.
Click on the Actual Effort cell of the task for which you want to enter some Actual Effort.
Enter a value.
For tasks which you have been assigned to, a blue clock ( ) will be displayed on the bottom right hand side of Actual Effort cells. Clicking on the blue clock will apply automatically the planned value.
If need be, you will be able to enter a Suggested remaining effort. Once submitted, this Suggested remaining effort may be applied to the Project by The Project Manager.
Click on the Remaining Effort cell of the task for which you want to enter some Remaining Effort.
In the Task popup, enter a new value in the Suggested remaining effort cell.
The Activity Log button allows you to display the hours you have dedicated to Agile Backlog Items and Work Items and otherwise facilitates how you update your timesheets.
Tasks and Team Members must be imported from Agile to another project using the Agile Synchronization feature in order for the corresponding data to be displayed in the Timesheet.
When the system uses the Agile or Work Items features, the Administrator can activate some options, which allows the Activity Log to be made available to end-users in the Timesheet workspace. Once the settings are activated, the Activity Log button is displayed.
In order to import Activity Logs:
Click on the Activity Log button.
In the Import activity logs popup, tick the checkboxes of the Agile Backlog Items or Work Items for which you you want to import the Activity logs.
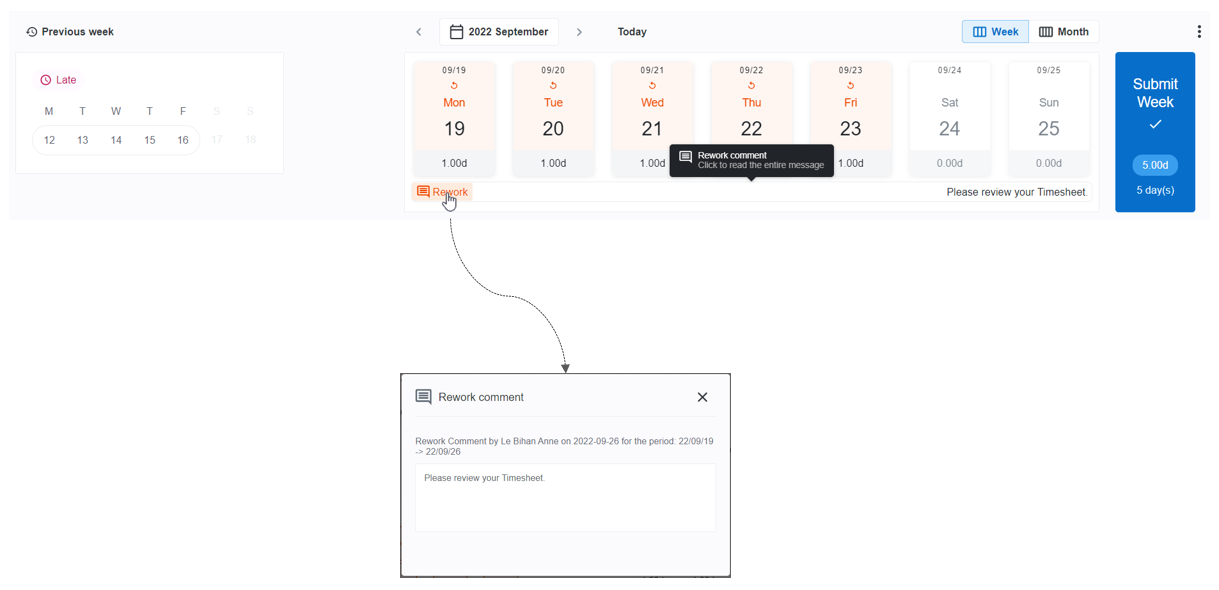
NoteClicking on the active Comments (
 ) icon prompts a read-only pop-up that allows you to review the comment previously entered.
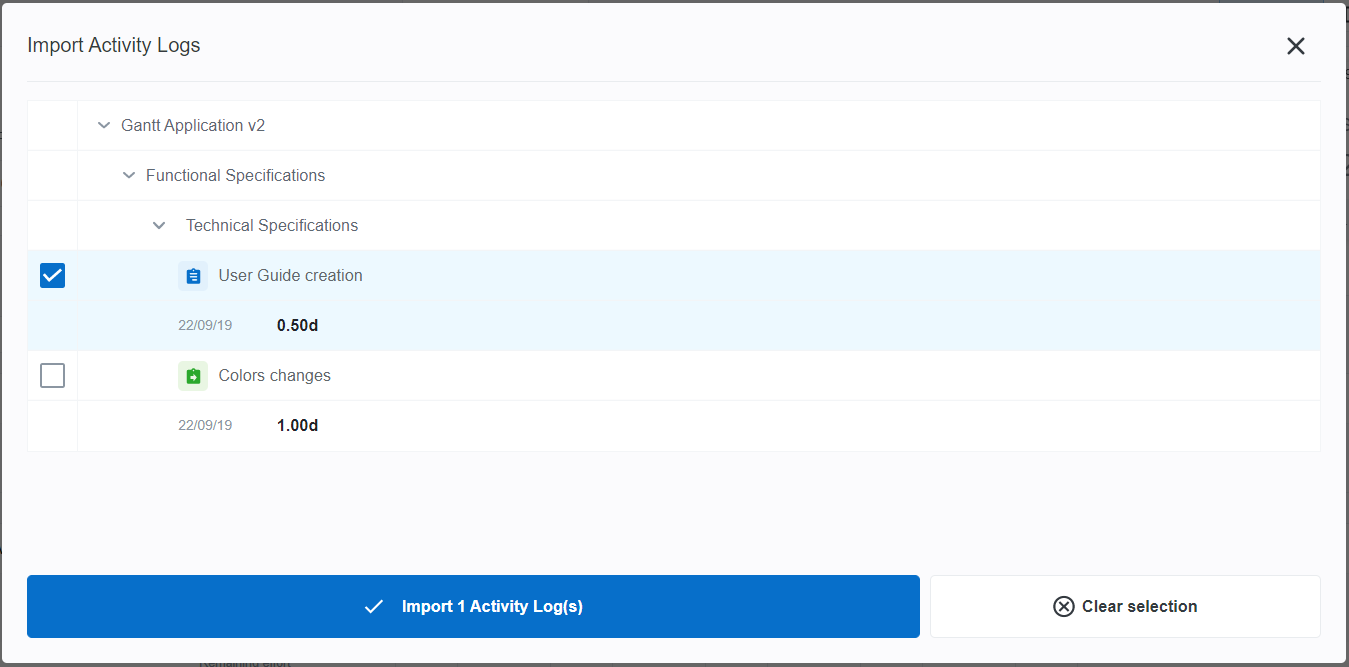
Click on the Import activity logs button. The corresponding Activity Logs will be automatically imported as Actual Effort into the Timesheet.
NoteUpon importing the Work Items Activity logs, the corresponding task will automatically be added to the spreadsheet.
NoteThe Import Activity Logs button is only available if the Agile registered logs are different from the Timesheet Actual Effort.
NoteActivity logs will not appear in the Import Activity Logs popup for closed projects/tasks, except if:
Your Timesheet included a closed task to which you were already assigned.
The task’s Activity Log had been imported prior to the task being closed by the Project Manager.
In this case, the activity’s effort will not be reimported.
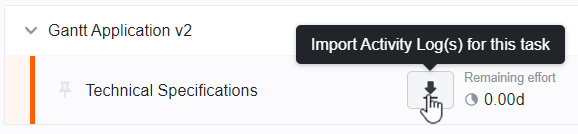
If Activity Logs are related to tasks, you will be able to import them with the following button accessible when hovering over the Task's name.
Sometimes Actual Effort values submitted for a task are not accepted by the Resource Manager or the Project Manager and are returned for rework to the Team Member.
When sending back a Timesheet, the Resource Manager or the Project Manager will be able to write a comment to his/her Team Member.
These Rework Comments will be displayed to the Team Member in the Tasks panel when the Rework comment has been entered by the Project Manager and in the Time Navigation panel when the Rework comment has been entered by the Resource Manager.