The Tasks tab available in the Resources workspace, provides a spreadsheet displaying for each Task for the selected project(s) the soft and hard Resource assignments, as well as the Cost Item assignments.
To facilitate the reading of the Tasks spreadsheet, several sorting and filtering fields are provided.
Upon accessing the Filters popup, the following filtering fields are available:
In addition, the main toolbar provides the following tools:
Show Distribution | Allows the user to display or not time-distributed data. When activated, the Time Navigation toolbar is also displayed. | |
Show Labor Assignments | Allows the user to choose whether to display all assignments, only hard assignments, or only soft assignments. | |
 | Search | Allows the user to look for a specific Task. |
Below each Task, the corresponding Soft Assignments, Hard Assignments, and Cost Item Assignments are displayed.
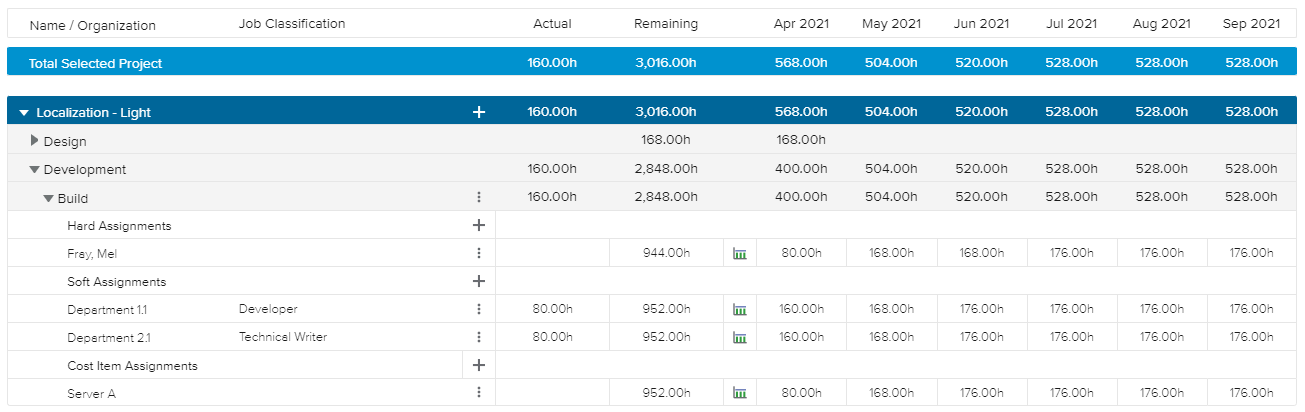
For each assignment, the following information is displayed when necessary: Name, Organization, Actual Effort, Remaining Effort, as well as the Total Effort, which can be displayed as follows:
When the Show Distribution switch button is deactivated, the spreadsheet shows the assignment’s Total Effort.
When the Show Distribution switch button is activated, the spreadsheet shows the time distributed Total Effort according to the selected time frame and intervals in the Time Navigation toolbar.
For Cost Items assignments, the Actual Units and the Remaining Units are displayed instead.
Upon clicking on the white Add ( ) button available at the project level, the user can create a task. In the prompted popup, he/she will have the following options for the task creation:
As a child of a selected Task – Prompts the user to select a parent task for the Task to be created.
After the last WBS Task – Inserts the Task at the end of the project, at the same level as the last task displayed.
In addition, clicking on the project's name, the corresponding Project Brief dialog box is displayed.
At the Task level, clicking on the More ( ) icon provides the following commands:
Edit Task | Opens the Task Details dialog box. |
Add Hard Assignment | Opens the Assign Resources dialog box, allowing the user to assign new Nominative Resources to the Task. |
Add Soft Assignment | Opens the Soft Assignment dialog box, allowing the user to either assign a Generic Resource to the Task, or to create a Soft Assignment from scratch. |
Add Cost Item Assignment | Opens the Assign Cost Items dialog box, allowing the user to assign new Cost Items to the Task. |
The Add () button available on the Hard Assignments, Soft Assignments, and Cost Assignments rows allows the user to create a new assignment for the corresponding assignment category.
At the Nominative Resource assignment level, clicking on the More () icon provides the following commands:
Resource Brief | Opens the Resource Brief dialog box. |
Team Member Details | Opens the Team Member Details dialog box. |
Scroll into View | Modifies the time period so that the first date when the Effort > 0 for the assignment is displayed. This option is only available when the Show Distribution switch button is activated. |
Edit Assignment | Opens the Labor Assignment dialog box, allowing the user to modify the assignment attributes. |
Replace Resource | Opens the Replace Resource dialog box, where the user can choose a new cost item to assign instead of the current one. |
Delete Assignment | Deletes the corresponding Hard Assignment. |
At the Soft Assignment level, clicking on the More () icon provides the following commands:
Scroll into View | Modifies the time period so that the first date when the Effort > 0 for the assignment is displayed. This option is only available when the Show Distribution switch button is activated. |
Edit Assignment | Opens the Labor Assignment dialog box, allowing the user to modify the assignment attributes. |
Fulfill Assignment | Opens the Fulfill Soft Assignment dialog box, allowing the user to choose the nominative resource(s) to assign. |
Delete Assignment | Deletes the corresponding Soft Assignment. |
Convert into Request | Opens the Create Allocation Request dialog box, which allows the user to request a Resource for the Soft Assignment. |
At the Cost Item assignment level, clicking on the More () icon provides the following commands:
Scroll into View | Modifies the time period so that the first date when the Units > 0 for the assignment is displayed. This option is only available when the Show Distribution switch button is activated. |
Edit Assignment | Opens the Cost Item Assignment dialog box, allowing the user to modify the assignment attributes. |
Replace Cost Item | Opens the Replace Cost Item dialog box, where the user can choose a new cost item to assign instead of the current one. |
Delete Assignment | Deletes the corresponding Cost Item Assignment. |
In addition, the user can define whether an assignment should be uniform or non-uniform:
 | Non Uniform | Indicates that non-uniform assignment is allowed. Upon clicking on it, the assignment only allows uniform assignment. |
 | Uniform | Indicates that only uniform assignment is allowed. Upon clicking on it, the assignment allows non-uniform assignment. |