The Filters panel allows the user to narrow down the list of displayed Allocation Requests in both the Requests Inbox and Requests Overview sub-tabs.
The Filters panel can be displayed or hidden using the following buttons:
 | Show | Allows the user to display the panel. When some filters are active, the icon is displayed in blue. |
 | Close | Allows the user to hide the panel. |
The following filtering options are available:
Organizations | Allows the user to display only Allocation Requests whose Organization has been selected. |
Job Classifications | Allows the user to only display Allocation Requests whose Job Classification has been selected. |
Skills | Allows the user to only display Allocation Requests whose Skills have been selected. |
Workflow States | Allows the user to only display Allocation Requests whose Workflow State has been selected. |
Task Allocation Status | Allows the user to only display Allocation Requests whose corresponding Task Allocation Status is either “Pending” or “Answered”. |
Display Requests | Allows the user to display Allocation Requests that have been created at the Project level, Task level, or both. |
Display requests with effort only | Allows the user to only display Allocation Requests whose Requested Effort > 0 for the selected time period. |
In addition, the following alert-related filters are available:
 | New Notes | Indicates the number of Requests with unread Notes. |
 | To Do | Indicates the number of Requests whose Workflow State is “Working”, “Rejected”, or “Reworked”. |
 | Due Soon | Indicates the number of open Requests whose Start Date (i.e., first date on which the Requested Effort > 0) falls within the Allocation Request Due Date Alert period. Settings The Allocation Request Due Date Alert period is defined by the Administrator with the “Allocation Request Problem Granularity” setting available in the System Settings workspace, Resource Settings folder, Allocations & Commitments tab, Allocations Options section. |
 | Overdue | Indicates the number of open Requests whose Start Date (i.e., first date on which the Requested Effort > 0) falls before Today’s date. |
 | To Be Accepted | Indicates the number of open Requests whose Workflow State is “Answered”. |
 | Not Synchronized | Indicates the number of Task Allocation Requests whose Requested Effort is not aligned with the Labor Assignments Total Effort (Soft Assignments or Hard Assignments, depending on the status of the request). Settings This alert is only available when the Administrator has activated the “Enable Convert Assignment into Request” setting available in the System Settings workspace, Resource Settings folder, Allocations & Commitments tab, Allocations Options section. |
The user can also take advantage of the Show Closed ( ) display option located in the top of the panel to display or hide Allocation Requests considered as Closed (i.e., Requests that have reached their final Workflow State, or Requests whose legacy “Closed” field has been set to yes).
Clicking on the Reset button located in the bottom right corner of the panel sets all the filters back to their default value.
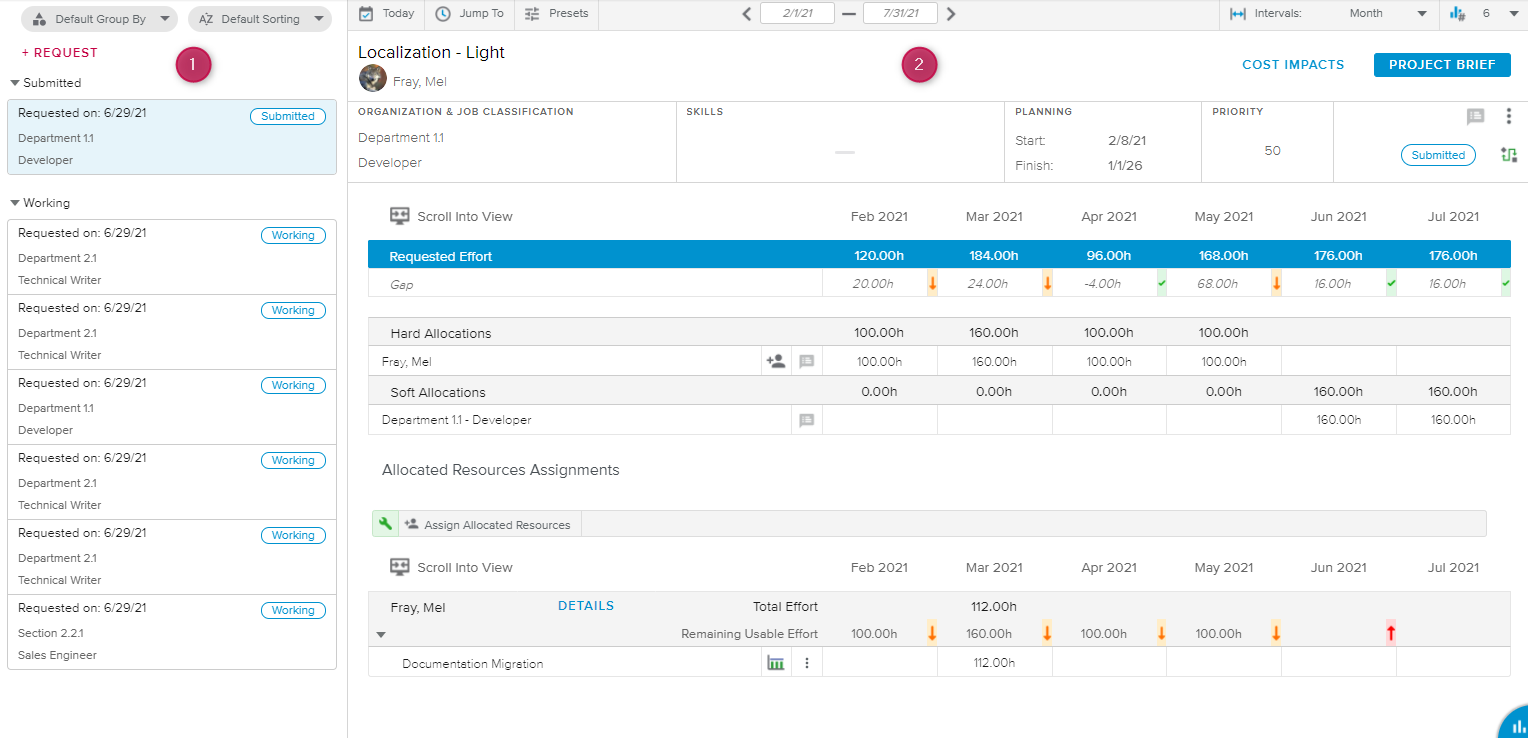
The Requests Inbox sub-tab allows the user to review the selected project Allocation Requests individually, and in a detailed manner.
The Requests Inbox sub-tab is made up of:
The Requests List panel, which allows the user to select the Allocation Request whose details are to be displayed.
The Request Details view, whose display varies depending on the status of the Request.
The Requests List panel displays the list of Allocation Requests for the selected project.
The number of elements displayed is conditioned by the "Set Inbox Number of Cards" setting available in the System Settings workspace, General Settings folder, Global Options tab.
The following display options are provided at the top of the panel for the user to manage the list:
Group By | Allows the user to group the list of Allocation Requests by Workflow State (default), Organization, or Job Classification. |
Sort By | Allows the user to sort the Allocation Requests by Start Date (default), or Priority. |
Clicking on the Add Request ( ) button opens the Create Allocation Request dialog box, allowing the user to create a new Allocation Request at the project level.
Each Allocation Request is displayed in the form of a card providing the following Allocation Request attributes: Task Name (if any, otherwise the “Requested on” date), Workflow State, Organization, and Job Classification.
The “Requested on” date is defined as follows:
Request creation date, if the Allocation Request was created in Sciforma 2021.07 version or higher.
Request Start Date (i.e., first date on which the Requested Effort > 0) for legacy requests.
Upon clicking on the Task Name or the requested date for a given Allocation Request, the details regarding the corresponding request are displayed in the right-hand side of the view.
The upper section of the header provides the following reminders regarding the selected project: Name (followed by the request’s Task or Requested date), and Manager 1.

The user can access the dialog boxes for more information:
Cost Impacts | Opens the Cost Impacts popup, allowing the user to review the impacts of the requests on the selected project’s cost. |
Project Brief | Opens the corresponding Project Brief dialog box. |
The following information regarding the Allocation Request is available in the header:
Organization & Job Classification | Indicates the Organization and Job Classification required for the Allocation. |
Skills | Indicates the Skills required for the Allocation. |
Suggested Resources | Displays the name of the suggested resource (if only one), or indicates that multiple resources have been suggested for the request. |
Planning | Indicates the Start and Finish dates for the request (i.e., the first and last dates for which the Requested Effort > 0). |
Priority | Indicates the level of priority for the Allocation Request (default value: 50). Note The lower the number, the more important the request. |
In addition to the Allocation Request Workflow State, the right-most section of the header provides the following tools:
 | Notes | Indicates whether or not there are new notes, and opens the Notes dialog box. |
 | More | Provides access to the following commands:
|
 | Workflow Actions | Allows the user to modify the Workflow State Vote associated with the Allocation Request. |
If no Allocation has been created yet for the selected Request, the Details section only displays a time-distributed spreadsheet showing the Requested Effort.
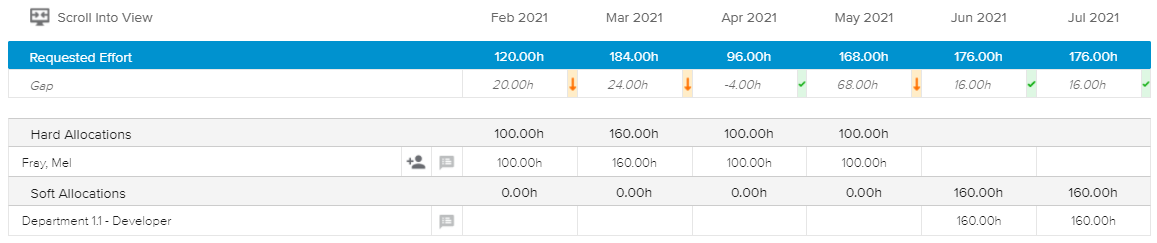
The Requested Effort is editable if the Allocation Request Workflow State is “Working”, “Rejected”, or “Reworked”.
Once some allocations are attached to the Allocation Request, additional information regarding the soft and hard allocations, as well as the gap between the Allocated and Requested Effort will be displayed.
The following tools are available for Hard Allocations:
 | Assign | Provides access to the following commands:
|
 | Add to Project Team | Allows the user to add the corresponding resource to the selected project Team. This command is displayed instead of the Assign button only available when the resource is not yet part of the team. In other words, the user needs to add the resource to the project team in order to be able to assign it. |
| Notes | Indicates whether or not there are new notes, and opens the Notes dialog box. |
This read-only spreadsheet provides a list of existing soft assignments that match the current request attributes (i.e., Organization, Job Classification, and Skills). To be displayed in the list, the soft assignments also need to have some Effort values entered in the selected time period.
The following tools are provided with the spreadsheet:
 | Sync Requested Effort | Allows the user to update the selected Allocation Request Requested Effort with the values of the existing Soft Assignments Total Effort values. |
| More | Provides access to the following commands:
|
The Allocated Resources Assignments section displays, for the resources allocated to the request, the existing Hard Assignments already created over the selected period.
The spreadsheet provides the following tools:
 | Scroll Into View | Scroll to the first date with Effort > 0 among all the Assignments. |
| Assign Allocated Resources | Allows the user to assign the Allocated Resources to the project Tasks. Upon clicking on this command, the user is prompted to select one or multiple Tasks. |
Details | Opens a popup with content similar to that found in the Resource Allocation Details view available in the Allocations tab, Resource Details sub-tab. | |
 | Uniform | Indicates that only uniform assignment is allowed. |
 | Non-Uniform | Indicates that non-uniform assignment is allowed. |
| More | Provides access to the following commands:
|
Colored indicators are provided to highlight the % shift between the resources Usable Effort and Total Effort. The user can access the legend of the colored indicators by clicking on the Legend ( ) button located in the bottom right corner of the view.
Colored Indicators are defined by the Administrator in the System Settings workspace, General Settings folder, Colored Indicators tab, Resource Utilization Preferences.
The Requests Overview sub-tab provides a list of the selected project’s Allocation Requests for the selected time frame.
In addition to the Time Navigation toolbar, the following display options are available:
 | Group By | Allows the user to group the requests by Organization (default), Job Classification, or Parent (Project and related Tasks, when relevant). |
| Show Allocations | Allows the user to display the Allocations associated with the Allocation Requests (if any). |
For each Request, the following attributes are displayed: Name, Organization, Job Classification, Skills, Workflow State, and Priority, along with the time-distributed Requested Effort.
Colored Indicators are provided to highlight the % shift between the Requested Effort and the Allocated Effort. The user can access the legend for the colored indicators by clicking on the Legend () button located in the bottom right corner of the view.
Colored Indicators are defined by the Administrator in the System Settings workspace, General Settings folder, Colored Indicators tab, Resource Utilization Preferences.
The spreadsheet provides the following tools to manage the requests:
 | New | Opens the Create Allocation Request dialog box. |
 | Delete | Allows the user to delete the selected Allocation Request(s). This command is only available if at least one Allocation Request is selected (i.e., the corresponding checkbox is ticked). |
 | Build | Opens the Build Allocation Requests dialog box, allowing the user to create Allocation Requests from existing Soft Assignments. This command is only available if at least one Soft Assignment exists for the selected project. |
 | Duplicate | Allows the user to create a copy of the selected Allocation Request(s). This command is only available if at least one Allocation Request is selected (i.e., the corresponding checkbox is ticked). |
 | Submit the selected Requests | Allows the user to send the selected Requests to the Resource Manager (if Requests Workflow State is "Working"). |
 | Shift Data | Allows the user to postpone (or bring forward) the selected time-distributed values. This command is only available if at least one Allocation Request is selected (i.e., the corresponding checkbox is ticked). |
 | Clear Selection | Allows the user to deselect all the elements in the spreadsheet. |
| Notes | Indicates whether or not there are new notes, and opens the Notes dialog box. |
| More | Provides access to the following commands:
|
In addition, when the Show Allocations () display option is activated, the following tools are available for each Allocation row upon clicking on the More () button:
View Details | Opens a read-only version of the Allocation Details dialog box. |
Quick Assign | If the Request is created at the Project level, the user is prompted to select the Task the Resource will be assigned to, and to select whether the assignment should be done in a Uniform way (based on the default rate) or Non-Uniform way (based on the Allocated Effort). If the Request is created at the Task Level, the request will be accepted and the corresponding soft assignment is fulfilled with the resource upon clicking on the command. |
Match and Fulfill | Opens the Assign from Allocation dialog box. |
Scroll Into View | Scrolls to the first date with Allocated Effort > 0 for the corresponding Allocation. |
The Resource Details sub-tab allows the user to review the selected project Allocated Resources individually and in a detailed manner.
The Resource Details sub-tab is made up of:
The Filters panel, which can be hidden or displayed depending on the user’s needs.
The Resources List panel, which allows the user to select the Allocated Resource whose detailed information is to be displayed.
The Resource Allocation Details view, which provides information regarding the selected resource’s allocations and assignments.
The Filters panel allows the user to narrow down the list of displayed Allocated Resources found in the Resources List panel.
The Filters panel can be displayed or hidden using the following buttons:
| Show | Allows the user to display the panel. When some filters are active, the icon is displayed in blue. |
| Close | Allows the user to hide the panel. |
The following filtering options are available:
Organizations | Allows the user to display only Allocated Resources whose Organization has been selected. |
Job Classifications | Allows the user to only display Allocated Resources whose Job Classification has been selected. |
Skills | Allows the user to only display Allocated Resources whose Skills have been selected. |
Contract Type | Allows the user to only display Allocated Resources whose Contract Type is "Internal" or "External". |
Resources | Allows the user to only display specific Allocated Resources. |
Show Inactive Resources | Allows the user to display resources whose Status is “Inactive”. |
In addition, the following alert-related filters are available:
| New Notes | Indicates the number of Allocations with unread Notes. |
 | Underassigned | Indicates the number of Allocated Resources whose Total Effort value (from the Assignments) falls below the Usable Effort value for the current period (according to the selection made in the Time Navigation toolbar). |
 | Overassigned | Indicates the number of Allocated Resources whose Total Effort value (from the Assignments) is greater than the Usable Effort value for the current period (according to the selection made in the Time Navigation toolbar). |
 | Not Assigned | Indicates the number of Allocated Resources with no Hard Assignment on the selected project. |
| Not in Project Team | Indicates the number of Allocated Resources that are not yet in the Project Team. |
 | Recently Created | Indicates the number of Project Allocations whose creation date falls within the Allocation Request Due Date Alert period. Settings The Allocation Request Due Date Alert period is defined by the Administrator with the “Allocation Request Problem Granularity” setting available in the System Settings workspace, Resource Settings folder, Allocations & Commitments tab, Allocations Options section. |
 | Recently Updated | Indicates the number of Project Allocations that were last modified during the Allocation Request Due Date Alert period. Settings The Allocation Request Due Date Alert period is defined by the Administrator with the “Allocation Request Problem Granularity” setting available in the System Settings workspace, Resource Settings folder, Allocations & Commitments tab, Allocations Options section. |
Clicking on the Reset button located in the bottom right corner of the panel sets all the filters back to their default value.
The Resources List panel displays the list of Allocated Resources for the selected project.
The number of elements displayed is conditioned by the "Set Inbox Number of Cards" setting available in the System Settings workspace, General Settings folder, Global Options tab.
The Group By () display option allows the user to group the list by Organization (default), Job Classification, or Contract Type.
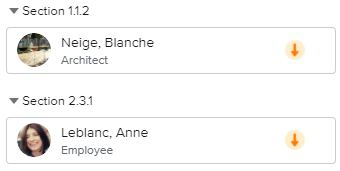
Each Allocated Resource is displayed in the form of a card featuring the following information: Resource Picture, Name, and Job Classification (or Organization if the Group By option is set to "Job Classification").
In addition, colored indicators are provided to highlight the % shift between the Usable Effort and the Total Effort (from the assignments) for a selected time period.
Colored Indicators are defined by the Administrator in the System Settings workspace, General Settings folder, Colored Indicators tab, Resource Utilization Preferences.
If the resource is not part of the Project Team yet, the Not in Project Team () icon will be available instead of the indicator.

The Details section header provides the following information regarding the selected resource: Picture, Name, Job Classification, and Organization.
In addition, the following commands are available in the right-hand side of the view:
Resource Brief | Opens the corresponding Resource Brief dialog box. |
Add to Team | Allows the user to add the selected resource to the Project Team. This command is only available if the resource does not yet belong to the Project Team. |
The Allocations time-distributed spreadsheet displays the Total Allocation and the Remaining Usable Effort of the resource, followed by the details of the Allocations, classified as follows:
Direct Allocations (i.e., allocations not linked to a request) – Only one direct allocation is possible per resource per project.
Confirmed Allocations – Allocations whose corresponding Allocation Request has reached its final Workflow State (by default, “Accepted”).
Pending Allocations – Allocations whose corresponding Request has not reached the final Workflow State yet.
Allocated Effort from Pending Allocations is not taken into account in the resource’s Usable Effort.
Highlighted cells are displayed to emphasize the Task (or Project) boundaries.
If the logged-in user is both the Project Manager and the Resource Manager, the Allocations will be editable directly in the spreadsheet.
The following tools are available to manage the allocations:
| Notes | Indicates whether or not there are new notes, and opens the Notes dialog box. |
| More | Provides access to the following commands:
|
The Resources Assignments section is displayed as soon as the selected resource becomes part of the project team.
The Add Assignment () button provides the following commands to create assignments for the selected resource:
Quick Assign | If the Allocation is created at the Project level, the user is prompted to select the Task the Resource will be assigned to, and to select whether the assignment should be done in a Uniform way (based on the default rate) or Non-Uniform way (based on the Allocated Effort). If the Allocation is created at the Task Level, the request will be accepted and the corresponding soft assignment is fulfilled with the resource upon clicking on the command. |
Assign/Fulfill from Allocation | Opens the Assign from Allocation dialog box. |
Upon clicking on the More () button on the Labor Assignment row, the following commands are available:
Edit Assignment | Opens the Labor Assignment dialog box. |
Edit Task | Opens the Task Details dialog box. |
Delete Assignment | Allows the user to delete the corresponding assignment. |
Scroll Into View | Scrolls to the first date with Allocated Effort > 0 for the corresponding Allocation. |
The Resources Overview sub-tab provides a list of the selected project's Allocations for the selected time frame.
The Filters panel allows the user to narrow down the list of Allocated Resources displayed in the spreadsheet.
The Filters panel can be displayed or hidden using the following buttons:
| Show | Allows the user to display the panel. When some filters are active, the icon is displayed in blue. |
| Close | Allows the user to hide the panel. |
The following filtering options are available:
The upcoming period considered in the Upcoming Events panel is defined by the Administrator using the “Upcoming Events Granularity (days)” setting available in the System Settings workspace, Resource Settings folder, Allocations & Commitments tab, Allocations Options section.
In addition, the following alert-related filters are available:
| New Notes | Indicates the number of Allocations with unread Notes. |
| Underassigned | Indicates the number of Allocated Resources whose Total Effort value (from the Assignments) falls below the Usable Effort value for the current period (according to the selection made in the Time Navigation toolbar). |
| Overassigned | Indicates the number of Allocated Resources whose Total Effort value (from the Assignments) is greater than the Usable Effort value for the current period (according to the selection made in the Time Navigation toolbar). |
| Not Assigned | Indicates the number of Allocated Resources with no Hard Assignment on the selected project. |
| Not in Project Team | Indicates the number of Allocated Resources that are not yet in the Project Team. |
| Recently Created | Indicates the number of Project Allocations whose creation date falls within the Allocation Request Due Date Alert period. Settings The Allocation Request Due Date Alert period is defined by the Administrator with the “Allocation Request Problem Granularity” setting available in the System Settings workspace, Resource Settings folder, Allocations & Commitments tab, Allocations Options section. |
| Recently Updated | Indicates the number of Project Allocations that were last modified during the Allocation Request Due Date Alert period. Settings The Allocation Request Due Date Alert period is defined by the Administrator with the “Allocation Request Problem Granularity” setting available in the System Settings workspace, Resource Settings folder, Allocations & Commitments tab, Allocations Options section. |
Clicking on the Reset button located in the bottom right corner of the panel sets all the filters back to their default value.
The Allocations spreadsheet lists all the project’s soft and hard allocations with some effort in the selected time period.
The user can take advantage of the Time Navigation toolbar as well as the following display options:
| Group By | Allows the user to group the view by Organization (default), Job Classification, or Contract Type. |
| Remaining Usable Effort | Allows the user to display or hide the Remaining Usable Effort row for each resource. |
The toolbar provides the following commands:


Upon clicking on the More () button of a Hard Allocation, the following commands are available:
Add to Project Team | Allows the user to add the selected resource to the Project Team. This command is only available if the resource does not yet belong to the Project Team. |
Quick Assign | If the Allocation is created at the Project level, the user is prompted to select the Task the Resource will be assigned to, and to select whether the assignment should be done in a Uniform way (based on the default rate) or Non-Uniform way (based on the Allocated Effort). If the Allocation is created at the Task Level, the request will be accepted and the corresponding soft assignment is fulfilled with the resource upon clicking on the command. |
Assign/Fulfill from Allocation | Opens the Assign from Allocation dialog box. |
Scroll Into View | Scrolls to the first date with Allocated Effort > 0 for the corresponding Allocation. |
In addition, clicking on the Details button for a specific resource opens a popup with the same content as that found in the Allocations tab, Resource Details view (focused on the selected resource).
Upon clicking on the More () button of a Soft Allocation, the following commands are available:
View Details | Opens the Allocation Details dialog box. |
Scroll Into View | Scrolls to the first date in the timeframe with Allocated Effort > 0 for the corresponding Allocation. |
In addition, clicking on the Spreadsheet button in the upper right corner of the view opens the Allocation Details popup, which provides content similar to that found in the Resources Overview sub-tab but in the format of a flat list.
The My Allocated Resources sub-tab is displayed for users who are both the Manager of the selected project and a Resource Manager. It aims at providing him/her the necessary tools to directly manage the Allocations of resources belonging to the Organization(s) he/she manages, without leaving the project context.
The Filters popup provides the following filtering options:
In addition, the Group By () display option allows the user to group the Resources by Organization (default), Job Classification, or Contract Type.
The My Allocated Resources time-distributed spreadsheet displays the Allocations information as follows:
Direct Allocations (i.e., allocations not linked to a request) – Only one direct allocation is possible per resource per project.
Confirmed Allocations – Allocations whose corresponding Allocation Request has reached its final Workflow State (by default, “Accepted”).
Pending Allocations – Allocations whose corresponding Request has not reached the final Workflow State yet.
The following tools are provided in the view to manage the allocations:
| New Hard Allocation | Allows the user to create a new Hard Allocation. |
| Update Allocations | |
| Delete | Allows the user to delete the selected Allocation. This command is only available when at least one allocation is selected (i.e., the corresponding checkbox is ticked). |
| Allows the user to deselect all the elements in the spreadsheet. | |
Brief | Opens the corresponding Resource Brief dialog box. | |
| More | Provides access to the following commands:
|
In addition, clicking on the Spreadsheet button in the upper right corner of the view opens the My Allocated Resources Details popup, which provides content similar to that found in the My Allocated Resources sub-tab but in the format of a flat list.