Evaluating a project is a crucial step in determining if the project is worthwhile. The project Home Page workspace, Evaluation tab gathers both the tools to enter comprehensive descriptions regarding the project and indicators that will eventually help assess and score the project.
The main toolbar is located on the top of the view and aims at providing the most important project information and commands.
The display of the main toolbar differs depending on the tab currently selected and whether the project is locked or unlocked.
Here is the list of the buttons users can encounter in the Project workspaces:
 | New | Allows the user to create a new project. |
 | Publish | Publishes any changes to the current project, but only if the current project is the active Working version. |
 | Edit | Opens the Project Administration dialog box. |
 | Lock | Locks the project so that other users cannot modify it. Upon locking a project, the Undo and Redo commands become available. Note This command is only available if the project is not yet locked by any user. |
 | Unlock | Unlocks a previously locked project. Note This command is only available if the project has been locked by the logged-in user. |
 | Undo | Erases the previous change done, reverting the project to its previous state. Note This command is only available if the project has been locked by the logged-in user. |
 | Redo | Reverses the action of the Undo command. Note This command is only available if the project has been locked by the logged-in user. |
 | Manage Evaluation Snapshot | Opens the Evaluation Trend dialog box. |
 | Change Scoring Template | Allows the user to modify the Template that is used to score and describe the project. |
 | Update from Connected Idea | Allows the user to update the scoring and descriptions with the values of a connected Idea. |
 | Manage Baselines | Opens the Manage Baselines dialog box. |
 | Workflow Actions | Allows the user to modify the Workflow State Vote associated with the project. |
 | Workflow | Displays the Workflow Information dialog box. |
 | More | Provides access to the following commands:
|
 | Review Assignments | Opens the Assignments Scheduling full screen view. |
 | Status Report History | Opens the Status Report History full screen view. |
 | Notes | Indicates whether or not there are new notes, and opens the Notes dialog box. |
 | Switch to Tracking Mode | Enables users to switch from Planning Mode to Tracking Mode. Only available if the Schedule Method is Critical Chain. |
 | Switch to Planning mode | Enables users to switch from Tracking Mode to Planning Mode. Only available if the Schedule Method is Critical Chain. |
The available Scoring Descriptions and Scoring Indicators are initialized through a Scoring Template. Scoring Templates are initialized by the Administrator in the System Data workspace, Ideas and Portfolio Folders tabs.
When no Scoring Template has been attached to the Project, an empty state is displayed with the following commands:
Attach a Template – Gives the user the opportunity to select a template from the Global Scoring Template list defined by the Administrator.
Insert from an Idea – Automatically fills the Evaluation with the selected Idea score and descriptions. This command is only available if at least one idea is connected to the Project.
When selecting a Portfolio Folder in the Administration workspace, Definition tab, a template could be inserted automatically if the Administrator as attached a scoring template to the portfolio folder (System Data workspace, Portfolio Folders tab).
The Evaluation tab can already be fulfilled if the selected project has a connection with a Source object (either an Idea or a project whose Nature is Business Case). In that case, the descriptions and scoring information displayed from the project will be inherited from the information entered at the Source object level.
Modifying the project’s scoring information will have no impact on the scoring of the source object. For more information regarding Connections, please refer to the Connections & Contracts article.
Users can change the Template by clicking the Change Scoring Template () button, available in the main toolbar. In doing so, they will be prompted to choose a new template in the Global Scoring Template list. Modifying the template will delete the descriptions and reinitialize the scoring indicators.
As the scores and descriptions can be changed as many times as the user wants, it is possible to track them (automatically or manually) using the Evaluation Trend dialog box, displayed upon clicking on the Evaluation Snapshot () button available in the main toolbar.
The Description sub-tab allows the user to describe very precisely the project with various rich text blocks.
The descriptions available come with the selected Scoring Template.
The Administrator can define the scoring descriptions in the System Data workspace, Evaluation tab, Scoring Descriptions sub-tab.
The Scoring sub-tab allows the user to enter values regarding various indicators. These values will then be computed in order to evaluate the project Score.
The Scoring indicators available come with the selected Scoring Template. The Administrator can define the scoring indicators in the System Data workspace, Evaluation tab, Scoring Indicators sub-tab.
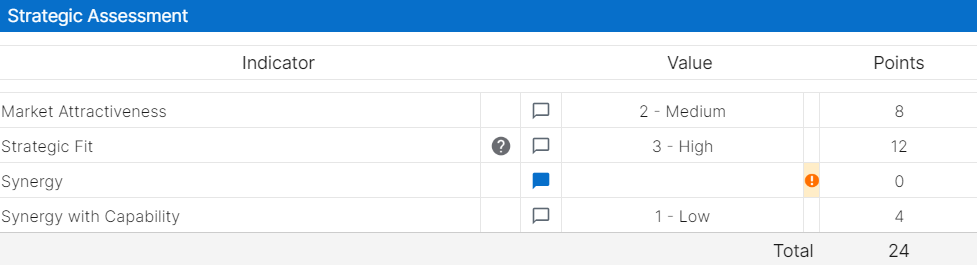
Each section of the Scoring sub-tab provides a spreadsheet. For each displayed indicator, the user can indicate a value. The value is then computed into points, and those points are taken into account in the Score of the project.
Some indicators can already be filled in by default by the Administrator, depending on the Default Scoring Template. However, the user can still modify the values to adjust the score.
Some cells in the spreadsheet can have an additional display:
 | Orange cell | Indicates that no value has been entered yet for the given Indicator. |
 | Question mark icon | The Administrator has left a comment or a description regarding this indicator. Upon clicking on the icon, a pop-up displays the corresponding information. |
Inactive Comment button | Indicates that no comment has been entered yet for the given indicator. Upon clicking on it, the Comments popup is displayed. | |
 | Active Comment button | Indicates that at least one comment has been entered for the given indicator. Upon clicking on it, the Comments popup is displayed. |

In the Comments popup, each comment displays the following information: Picture or Initials of the user who posted the comment, name of the creator, Date of the comment, and the comment itself.
In addition, the following tools are provided in the Comments popup:
| New | Opens the New Comment popup, which provides a Rich text field wherein the user is able to add a comment. |
 | More | Provides access to the Edit and Delete commands that allow the user to manage the corresponding comment. Note These commands are only available for Comments that have been created by the Logged-in User. |
The Idea Connections sub-tab is only displayed if at least one Idea is connected to the project. It features a spreadsheet listing all the Ideas that have been connected to the currently selected Project.

Each Idea connection is defined by the following attributes: Name, Sponsor, Originator, Created Date, Idea Folder, Score, and Workflow State Vote.
The following tools are provided:
| Notes | Indicates whether or not there are new notes, and opens the Notes dialog box. |
 | Details | Opens the corresponding Idea Details dialog box. It is a read-only dialog box, unless the user has Write Permissions on the corresponding Idea. |
 | Link | Switches the view to the corresponding Idea Center workspace. |
Ideas are connected to Projects by using the Idea Center workspace, Idea Details view, Connections sub-tab (or through the Idea workflow state vote modification).