The Organization Center workspace aims to provide all the main information regarding the Resources belonging to the Organization that the Resource Manager is responsible for.
It provides the Resource Manager with the following capabilities:
Review submitted Timesheets and Calendars
Quickly Approve or Reject submitted Calendar Requests
Edit the definition of the resources
Review the resources utilization
Perform a capacity forecast and manage the forecast history
The Overview tab has been designed to allow Resource Managers to quickly review items requiring immediate actions.
The Submitted Items per Organization chart counts the number of items (i.e., Timesheets and Calendars) requiring attention per organization branch.
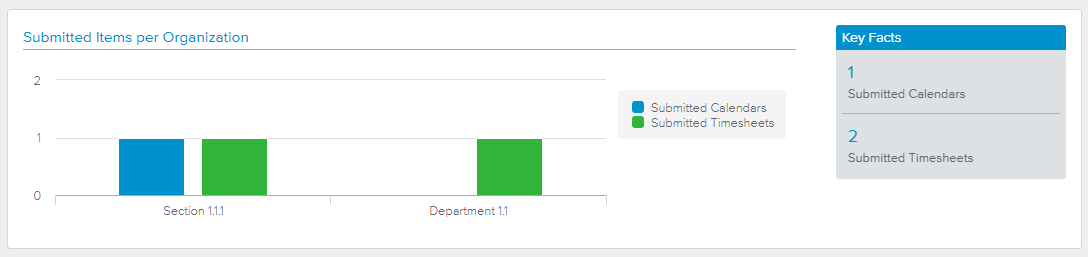
On the right-hand side, the following Key Facts are provided: Number of Submitted Calendars and number of Submitted Timesheets.
The Time Period considered is defined by the Administrator with the “Timesheet Retrieval Time Frame” option available in the System Settings workspace, Resource Settings folder, Global Options tab.
The Submitted Calendars spreadsheet displays the following information regarding the calendars that need to be approved: Name, Manager 1, and Calendar Status.
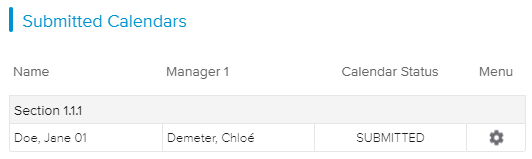
When a Resource Manager approves or rejects a submitted calendar, that calendar disappears from the spreadsheet.
Once the Resource Manager approves the changes to a Team Member’s calendar, an individual calendar for that resource is created/updated, and any changes are reflected in the tasks that the Team Member is assigned to.
The Menu ( ) button gives access to the following commands:
See Details – Switches the view to the Resource Validation workspace, Calendars tab, Calendar Details full screen view, displaying the detailed information of the corresponding Calendar.
Reject (the calendar)
Approve (the calendar)
The Submitted Timesheets spreadsheet displays the following read-only information regarding the Timesheets that need to be reviewed: Name, Manager 1, Actual Effort that has been submitted, and Submitted Start Date.
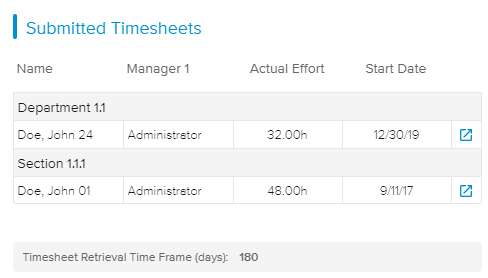
Upon clicking on the Open ( ) button for a specific Timesheet, the Resource Validation workspace, Timesheet tab, Timesheet Details full screen view is displayed.
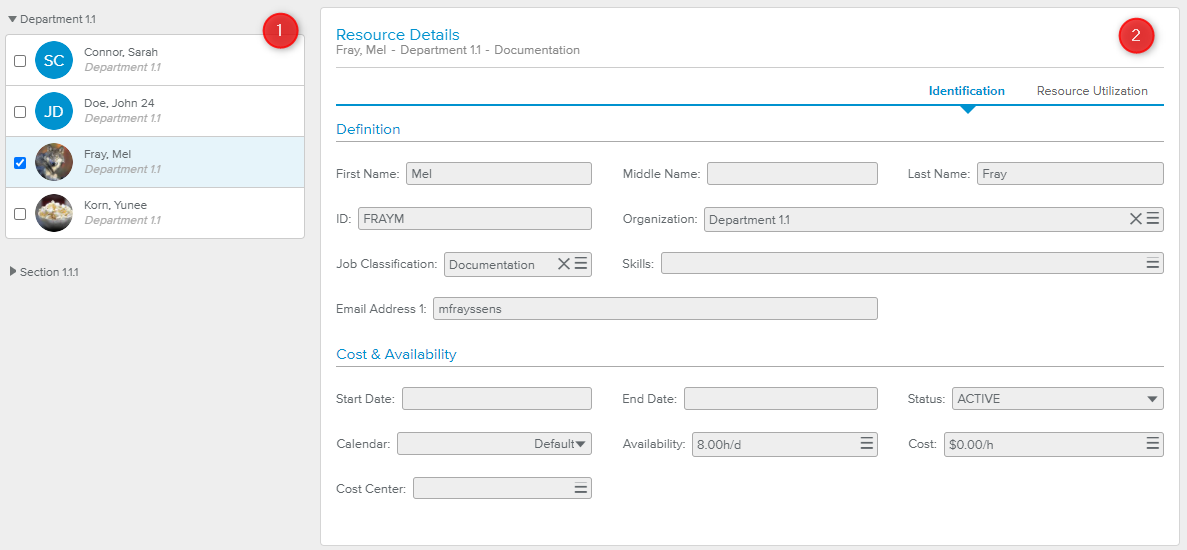
The Resource Details tab allows the Resource Manager to edit the definition for the selected resource (assuming the logged-in user has the necessary permissions) and to review how it is allocated (both in a high-level graphical format and in detailed spreadsheet format showing assignment data per project and task) for a selected period of time.
The Resource Details tab is made up of two sections:
The Resources List panel, located on the left-hand side
The Resource Details view, located on the right-hand side
Additionally, the main toolbar provides the following display options:
Status Filter | Allows the user to only display the Resources with the selected Status: Active, Inactive, or Planned. | |
 | Group By | Allows the user to sort the Resources by Organization, Job Classification, Status, or Contract Type. |
 | Charts | Allows the user to display or hide the Resource Utilization chart. |
 | Search | Allows the user to directly search for a specific resource. |
The Resources List panel displays all the resources for the selected Organizations.
Each Resource is represented by a card, which displays the following information:
Resource’s picture or initials
Resource’s Name
Resource’s Organization
Upon selecting a Resource card, the resource is made current (background in light blue color) and all its detailed information is displayed in the Resource Details view, located on the right-hand side of the view.
The Resource Details view provides two sub-tabs:
Identification sub-tab, which allows the Resource Manager to view and edit all the selected Resource’s attributes.
Resource Utilization sub-tab, which allows the Resource Manager to review the selected Resource’s effort.
The Resource Details view will be editable only if the "Enable Resource Details Edits" option has been activated by the Administrator in the System Settings workspace, Resource Settings folder, Display Preferences tab.
The Identification sub-tab provides the resource's main attributes.
The Resource Definition section displays the main attributes of the selected resource: ID, First Name, Middle Name, Last Name, Organization, Job Classification, Skills, Email Address 1, Contract Type, and Contractor.
The Advanced Skills section enables users to associate a level (Beginner, Intermediate, or Expert) to a skill for that selected resource.
Advanced Skills are only available if the Administrator has activated the "Enable Resource Advanced Skills Definition" option available in the System Settings workspace, Administration Settings folder, Display Preferences tab.
The Cost & Availability section displays the following attributes for the selected resource: Start Date, End Date, Status, Availability, Calendar, Cost, and Cost Center.
The Start Date and End Date fields allow the user to indicate the date on which the resource entered the company and the date when the resource quit the company.
The Resource Utilization sub-tab provides the assignments spreadsheet, which displays detailed assignment data for each project and task the resource has been assigned to within a selected period of time.
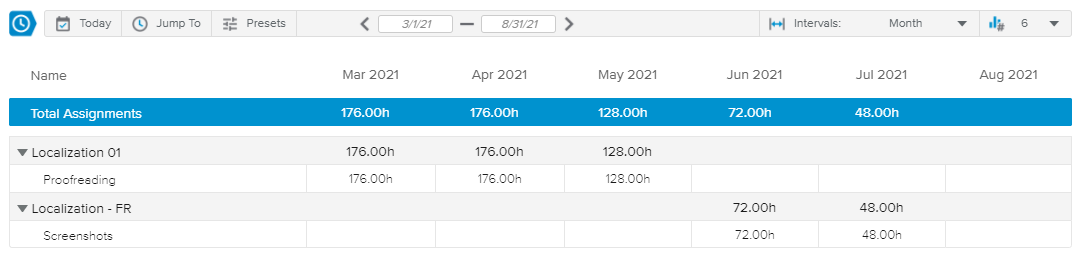
Colored indicators are provided to highlight the % shift between the resources Total Effort (assignments) and Available Effort. The user can access the legend of the colored indicators by clicking on the Legend ( ) button located in the bottom right corner of the view.
Colored Indicators are defined by the Administrator in the System Settings workspace, General Settings folder, Colored Indicators tab, Resource Utilization Preferences.
When the Charts () display option is activated, the Resource Utilization chart is displayed in both the Identification and the Resource Utilization sub-tabs.

It compares the Total Effort versus the Available Effort within the selected period of time, as well as the Usable Effort.
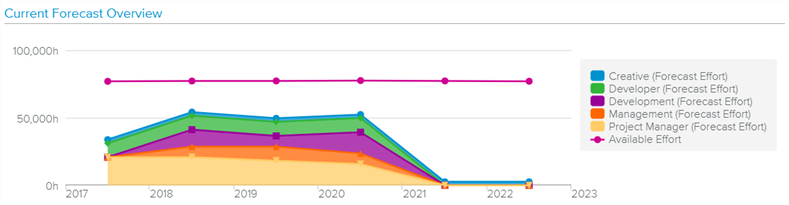
The Capacity Forecasts tab helps the Resource Managers track their team’s workload, by comparing Forecast Effort (for each Job Classification) and Available Effort (all Job Classifications taken together).
The Capacity Forecast spreadsheet allows the user to enter the capacity forecast for each Job Classification.
The user should first define the time period and the time interval for the forecast by taking advantage of the Time Navigation toolbar located at the top of the view.
The Capacity Forecast spreadsheet makes accessible the following commands:
 | New | Adds a new row to the spreadsheet, allowing the user to enter a Job Classification and the corresponding forecasted effort. |
 | Delete | Deletes the selected capacity forecast row(s) in the spreadsheet. This command is only available if at least one row is selected (i.e., the corresponding checkbox is ticked). |
 | Capture | Makes a snapshot of the current Capacity Forecast. |
 | History | Opens the Capacity History dialog box, which displays all the captured data sorted by job classification and date. This command is only available if the Capture command has been used at least once. |
Upon activating the Charts () display option, the Current Forecast Overview chart is displayed, enabling the user to compare at a glance the Available Effort and the Forecast Effort.