 |
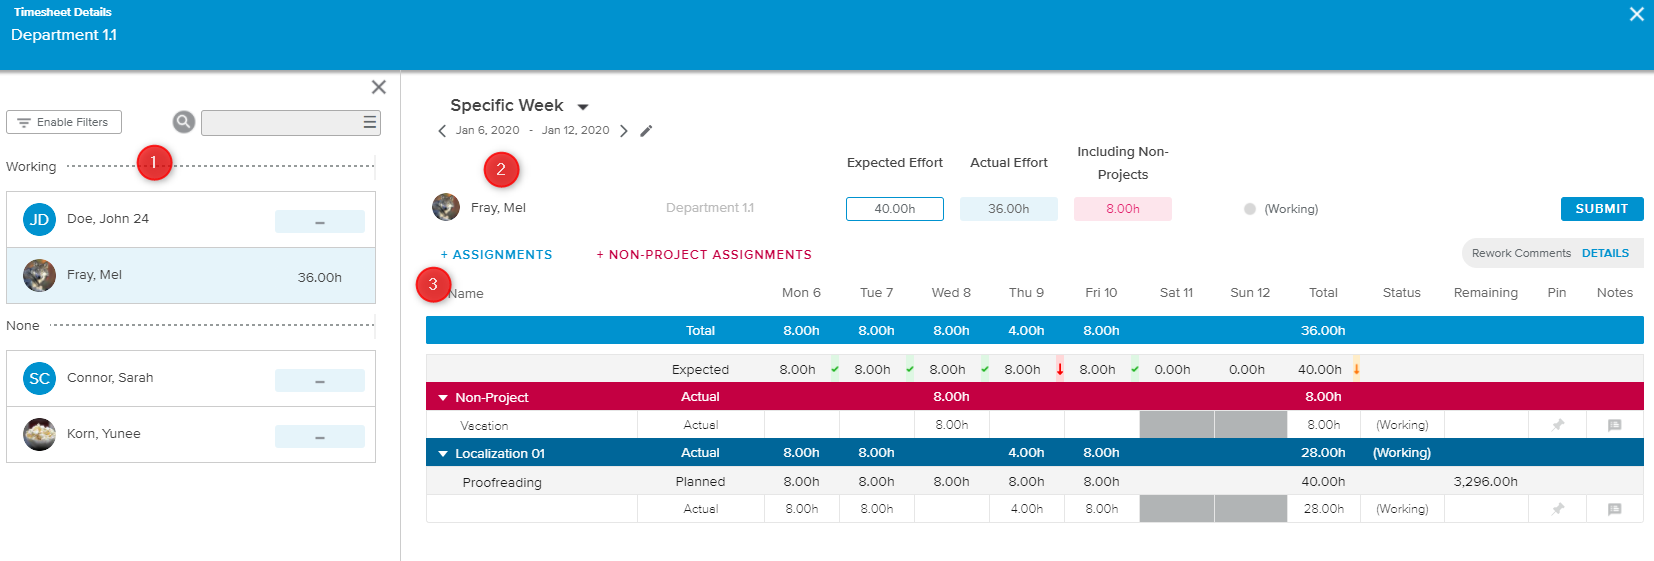
The Timesheet Details full screen view is made up of:
The Resources List panel,
The Summary section, and
The Details section.
The list of Resources (grouped by Timesheet Status) is displayed on the left-hand side of the view and can be displayed or hidden using the following buttons:
 | Show | Allows the user to display the panel. |
 | Close | Allows the user to hide the panel. |
Each Resource card displays the following information: Resource Name and Timesheet Total Actual Effort.
If the Contract Type feature is enabled, External Resources will be flagged with the External ( ) icon.
Upon clicking on the Resource Name, the corresponding information will be displayed on the right-hand side of the view.
The user can take advantage of the Search ( ) option to look for a specific Resource’s Name in the list.
The Filters ( ) popup provides the following options:
Organizations – Allows the user to only display Resources whose Organization has been selected.
Job Classifications – Allows the user to only display Resources whose Job Classification has been selected.
Contract Type – Allows the user to select whether to only display Internal Resources, External Resources, or both.
Show Inactive Resources – Allows the user to display Resources whose Status is “Inactive”.
Show Reviewed & Approved Timesheets – Allows the user to display Timesheets whose Status is "Reviewed" or "Approved".
The summary section provides the following information regarding the Timesheet: Resource’s Initials or Picture, Resource Name, Expected Effort, Actual Effort, Including Non-Project, and Status.
Clicking on the Resource’s name opens the corresponding Resource Brief dialog box.
Corrections can be displayed as well if the Administrator has activated the “Enable Timesheet Corrections” setting.
The Details section provides the Timesheet spreadsheet for the selected time frame.
If available, the zoom option available in the upper right corner of the view allows the user to select a granularity for the data displayed in the Timesheet. The options available in the Zoom picklist are different depending on the interval selected.
For further information, please refer to the Time Navigation Toolbar article available in the Library section of this topic.
In the Timesheet spreadsheet, the Actual Hours values are displayed with different colors according to their status. The legend is as follows:
Working: Dark grey font on white background
Submitted: Dark grey font on light grey background
Reviewed: Blue font
Approved: Green font
Rework: Red font
The fields are editable if the Timesheet is not in submitted status. The Resource Manager can modify the Timesheet himself if it is required, but only if he/she has the corresponding permissions.
The user can manage the information displayed in the Timesheet by accessing the Display Options ( ) popup, which provides the following options:
Show Hidden | Allows the user to display or hide the assignments that have been previously hidden in the Timesheet. |
Show Parent | Allows the user to display the parent of the tasks to which the user is assigned. When this setting is activated and depending on the "Set Show Parent Task Scope" option set up by the Administrator, either only the direct parent will be displayed, or the entire list of all the parents will be displayed. |
Hide Planned Values | Allows the user to temporarily remove the Planned Values rows. |
Hide Zero Effort Assignments | Allows the user to temporarily remove the Assignments rows for which the team member has no Effort values. |
The following options are available directly in the spreadsheet:


When tasks are closed by the Project Manager, the following rules apply:
Closed tasks assignments with at least one non-zero Actual Hours value in the selected period will be displayed.
Closed tasks assignments with only zero Actual Hours values will be removed from the timesheet view regardless of whether they are planned hours or not.
Closed tasks will always be hidden in the Add Assignment list.
The logged-in user has access to the following commands (available under certain conditions) to perform actions on the selected Timesheet:
+ Assignments | Allows the Resource Manager to assign resources to tasks of published projects. This command is only available when the Timesheet is not submitted. |
+ Non-Project Assignments | Allows the user to add Non-Project tasks to the Timesheet. This command is only available when the Timesheet is not submitted. |
Submit | Allows the Resource Manager to submit actuals instead of the Team Member. The Submit button is available if the Timesheet is not submitted or only partially submitted. |
Review | The Resource Manager accepts the actual data submitted for a specific task. The Review button is available if the Timesheet is submitted or partially submitted. |
Rework | The Resource Manager does not accept the actual hours and returns the timesheet to the Team Member to be reworked. The Rework button is available if the Timesheet is submitted or partially submitted and has been reviewed. Reworking a Timesheet will allow the resource to edit it in order to make necessary changes. Rework will always set the Timesheet in Rework Status for the entire selected period. |
If the Enable Comments upon Rework State option has been activated by the Administrator, Resource and Project Managers will be able to add a comment when sending back the Timesheet to the Team Member. In this case, the Rework Comments alert display will differ depending on whether or not some unread comments are available:
Blue – No unread comments
Red – Unread comment(s)
Upon clicking on the alert “Details” label, the Rework Comments History dialog box is displayed, allowing the user to read and manage the comments.
 |
The Rework Comments History dialog box makes available the following tools:
 | Mark all as Read | (located in the toolbar above the spreadsheet) – Marks all the comments of the spreadsheet as read. |
 | Delete | Allows the user to delete the comment. This command is only available if at least one comment is selected (i.e., the corresponding checkbox is ticked). |
 | Link | Closes the dialog box and switches the Timesheet view to the time period corresponding to the comment. |
| Read | Indicates the comment as read. Upon clicking on it, the icon changes to an unread icon. Read comments will not be displayed unless the Show Read Comments switch button is activated. |
| Unread | Marks the comment as unread. Upon clicking on it, the icon becomes a read icon, and the comment is no longer displayed in the spreadsheet unless the Show Read Comments switch button is activated. |
The Administrator can activate the Rework Comments by switching on the "Enable Comments upon Rework State" setting available in the System Settings workspace, Project Settings folder, Time Tracking Options tab.