Take a tour of all workspaces and views related to this topic.
The main purpose of this workspace is to allow Team Members to report the amount of time they have actually worked on the tasks they were assigned to (or on tasks that they were not originally assigned to).
Depending on the options selected by the Administrator in the System Settings workspace, features or displayed information can differ from one system to another. Certain Settings might impact the Timesheet workspace.
Depending on the Intervals and Zoom options selected by the Administrator, the Time Navigation toolbar of the Timesheet workspace can offer different options:
 | Intervals | If available, allows the user to select either a weekly view or a monthly view. |
 | Zoom | If available, allows the user to select a granularity for the data displayed in the Timesheet. The options available in the Zoom pick-list are different depending on the interval selected. |
For intervals and zoom options specific to Timesheets, please refer to the Time Navigation toolbar article available in the Library section.
Above the Timesheet, the following options are available to the user:
Show Parent | Allows the user to display the parent of the tasks to which the user is assigned. When this setting is activated and depending on the "Set Show Parent Task Scope" option set up by the Administrator, either only the direct parent will be displayed, or the entire list of all the parents will be displayed. | |
Display Activity Logs | Allows the user to view the Activity Log panel. | |
 | Show Hidden | Allows the user to display or hide the assignments that have been previously hidden in the Timesheet. |
 | Search | Allows the user to search Timesheet rows based on the Project or Task Name. |
In addition, the Filters popup can provide the following options:
Hide Corrections | Allows the user to temporarily remove the Corrections rows when the corresponding feature is activated. |
Hide Planned Values | Allows the user to temporarily remove the Planned Values rows. |
Hide Zero Effort Assignments | Allows the user to temporarily remove the Assignments rows for which he/she has no Effort values. |
The command buttons are available in the Timesheet view:
Allows the user to add non-planned tasks to the Timesheet. | |
Non-Project Assignments | Allows the user to add Non-Project tasks to the Timesheet. |
Allows the user to send the Timesheet to the Resource Manager for review. |
For further information on the use of the commands, please refer to the Library section of this topic.
If the Enable Comments upon Rework State option has been activated by the Administrator, Resource and Project Managers will be able to add a comment when sending back the Timesheet to the Team Member. In this case, the Rework Comments alert display will differ depending on whether or not some unread comments are available:
Blue – No unread comments
Red – Unread comment(s)
Upon clicking on the alert “Details” label, the Rework Comments History dialog box is displayed, allowing the user to read and manage the comments.
 |
The Rework Comments History dialog box makes available the following tools:
 | Mark all as Read | (located in the toolbar above the spreadsheet) – Marks all the comments of the spreadsheet as read. |
 | Delete | Allows the user to delete the comment. This command is only available if at least one comment is selected (i.e., the corresponding checkbox is ticked). |
 | Link | Closes the dialog box and switches the Timesheet view to the time period corresponding to the comment. |
| Read | Indicates the comment as read. Upon clicking on it, the icon changes to an unread icon. Read comments will not be displayed unless the Show Read Comments switch button is activated. |
 | Unread | Marks the comment as unread. Upon clicking on it, the icon becomes a read icon, and the comment is no longer displayed in the spreadsheet unless the Show Read Comments switch button is activated. |
The Administrator can activate the Rework Comments by switching on the "Enable Comments upon Rework State" setting available in the System Settings workspace, Project Settings folder, Time Tracking Options tab.
 |
In the Timesheet, the user can enter his/her Actual Hours (a.k.a. Actual Effort), and update the Remaining Estimates (a.k.a. Remaining Effort).
The following tools are provided:
 | Add Assignment | Allows the user to add an assignment directly to the corresponding project. |
 | Notes | Enables the Team Member to enter daily Notes. |
 | Hide | Enables the Team Members to hide some assignments from the Timesheet view. Upon using this option at the Project-level, the whole project assignments and the project itself will be hidden. |
| Show | Enables the Team Members to show previously hidden assignments. |
 | Pin | Enables the user to pin tasks, so that they will always be displayed in the Timesheet, even when the Team Member is not assigned to the task. |
Hidden assignments will only be shown if the Show Hidden () display option is activated.
In addition, upon clicking on a project name, the corresponding Project Brief dialog box will be displayed.
In the Timesheet workspace, the Actual Effort values are displayed with different colors according to their status. The legend is as below:
Submitted – Dark grey font on light grey background
Reviewed – Blue font
Approved – Green font
Rework – Red font
The tasks closed by the Project Managers will behave as follows:
Closed tasks assignments with at least one non-zero Actual Hours value in the selected period will be displayed.
Closed tasks assignments with only zero Actual Hours values will be removed from the timesheet view regardless of whether there are planned hours or not.
Closed tasks will always be hidden when using the Add Assignment.
The Activity Log panel allows users to display the hours they have dedicated to Agile Backlog Items and Work Objects and otherwise facilitates how they update their timesheets.
Tasks and Team Members must be imported from Agile to another project using the Agile Synchronization feature in order for the corresponding data to be displayed in the Timesheet.
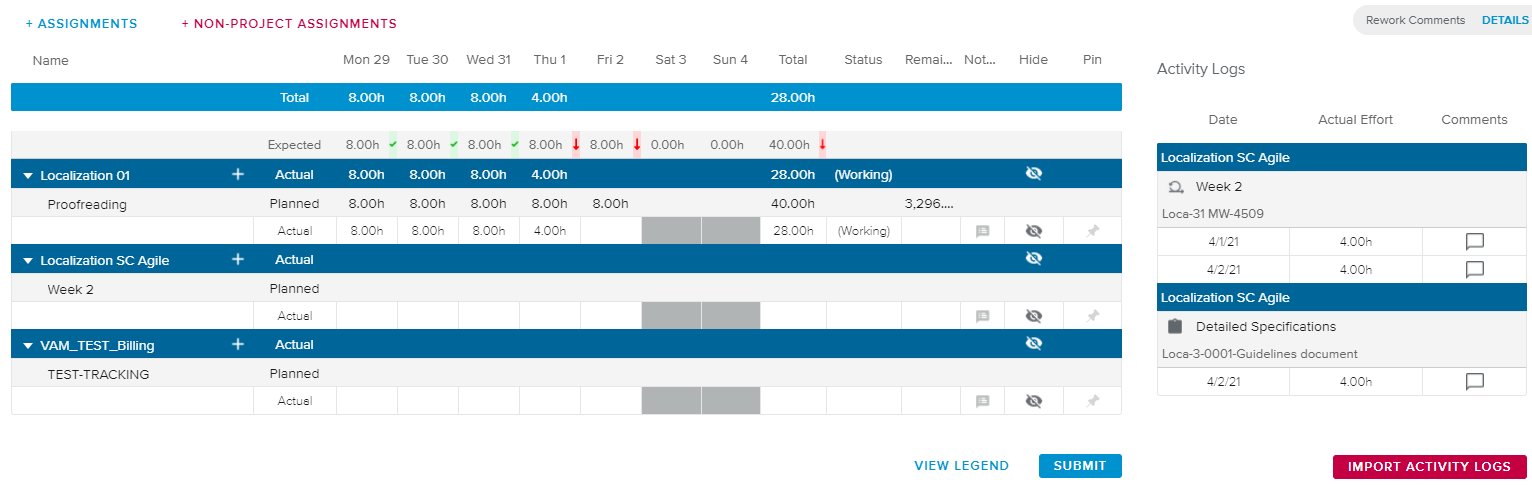 |
When the system uses the Agile or Work Objects features, the Administrator can activate some options, which allows the Activity Log to be made available to end-users in the Timesheet workspace. Once the settings are activated, the Display Activity Logs switch button is displayed in the upper left corner of the view.
On the left-hand side of the view, the Timesheet is displayed, and behaves in the same way as described in the Timesheet section. Once the Display Activity Logs switch button is activated, the read-only Activity Logs panel is displayed on the right-hand side of the view. Here, users can view the time they have dedicated to their Agile tasks and Work Objects (as entered in the Activity Log sections of the Backlog Item and Work Item dialog boxes).
The Activity log spreadsheet provides, for each project, the following information:
Regarding synchronized Agile Iterations (
 ): Backlog Item Key and Name, the Log entry Date, and Actual Effort of the entry. The Agile Iteration must be synchronized in the Gantt chart, Agile Synchronization Problems panel for the user to be able to import the Activity logs.
Regarding Work Items related to a Task (
 ): Work Object Key and Name, the Log entry Date, and the Actual Effort of the entry. Upon importing the Work Items Activity logs, the corresponding task will automatically be added to the spreadsheet.
Clicking on the active Comments ( ) icon prompts a read-only pop-up that allows the user to review the comment previously entered.
Upon clicking on the Import Activity Logs command, the corresponding Activity Logs will be automatically imported as Actual Effort into the Timesheet.
 |
A warning message will be displayed when importing the Work Items Activity logs if the “Related to Task” field is a Parent task.
The Import Activity Logs button is only available if the Agile registered logs are different from the Timesheet Actual Effort.