The purpose of the Backlog Item dialog box (i.e., creation, modification, read-only) differs depending on the way it is accessed.
The dialog box is made up of:
A header, which provides the Backlog Item's key Information and commands,
A common section, which is always displayed and provides the main commands and attributes, and
A series of optional sections that can be added by using the buttons located on the right-hand side of the dialog box.
To remove a section, the user has to delete all the existing objects it contains first (if any).
In cases where the Backlog Item dialog box is used to create a new Backlog Item, the following buttons will be available in the bottom right section of the dialog box:
Done – Allows the user to complete the Backlog Item creation and closes the dialog box.
Done & New – Validates the Backlog Item creation and opens a new Backlog Item dialog box for the user to create the next Backlog Item.
Cancel – Closes the dialog box without creating the Backlog Item.

The upper section of the dialog box provides the Backlog Item Key, Name, and Workflow State, as well as the following commands:
 | Workflow Actions | Allows the user to change the Backlog Item Workflow State. |
 | Notes | In addition, the Notes ( |
 | More | Provides access to the following commands:
|

The following attributes are also displayed:
Assignee | Indicates the Resource assigned to the Backlog Item. The following actions are possible:
|
Iteration | Indicates the Iteration the Backlog Item is attached to. The following actions are possible:
|
Release | Indicates the Release the Backlog Item is attached to. The following actions are possible:
|
Epic | Indicates the Epic the Backlog Item is attached to. The following actions are possible:
|
Story Points | Indicates the number of Story Points defined by the user for this Backlog Item. For Task Backlog Items, the Estimated Effort can be displayed instead (if the Administrator has deactivated the "Allow Story Points Estimates for Task Backlog Items" option in the System Settings workspace, Agile Settings folder, Global Options tab). |


The main section provides the following attributes: Name, Type, Team, Business Value, Priority, Due Date, and Accepted.
The Planning section provides the following information: Story Points, Completed Date, Stretch Item, Estimated Effort, Actual Effort, and Remaining Effort.
The Story Points are only available if the Allow Story Points Estimates for Task Backlog Items option has been activated in the System Settings workspace, Agile Settings folder, Global Options tab.
The user can add and delete the optional sections by using the buttons available on the right-hand side of the dialog box.

The Tasks section provides the following indicators for the connected Backlog Items whose Type is Task:
Backlog Items – Provides the number of Completed Backlog Items, the total number of Backlog Items, the corresponding progress bar, and the% Completed.
Story Points – Provides the number of completed Story Points, the total number of Story Points, the corresponding progress bar, and the% Completed.
Estimated Effort, Actual Effort, and Remaining Effort
NoteThe Estimated Effort and Remaining Effort fields are only available if the corresponding setting has been enabled in the System Settings workspace, Agile Settings folder, Global Options tab. The Actual Effort field will be editable only if the Activity Log feature is disabled for the project.
The rest of the section is identical to the Connections one, except that it only concerns Tasks Backlog Items. Please see below for more information regarding the management of the connections.
When creating a Task Backlog Item from the Tasks section, the newly created Backlog Item will automatically inherit the same Epic, if any.
The Connections section allows the user to review the connections between Backlog Items. Connections can be created in two ways:
Manually – The user creates a connection between a Story Backlog Item and, for example, related Task Backlog Items to identify an element that has been broken down into smaller pieces.
Automatically – As the user has converted a Checklist item into a Backlog Item, the connection is automatically created between the newly created Backlog Item and the Backlog Item to which the Checklist item belongs.

Each connection is represented by a card which displays the following Backlog Item attributes: Key,Type, Name, Assignee, and Workflow State.
Work Items can also be displayed when using the Work Management features.
The following tools are available:
 | Create & Connect | Allows the user to create a Work Item or a Backlog Item that will be connected to the currently selected Backlog Item. |
 | Connect to Existing | Prompts the user to select a Backlog Item or a Work Item to create a connection. |
| More | Provides access to the following commands:
|
The Checklist section allows the user to identify the different “steps” or “sub-tasks” to be managed in the same Backlog Item.
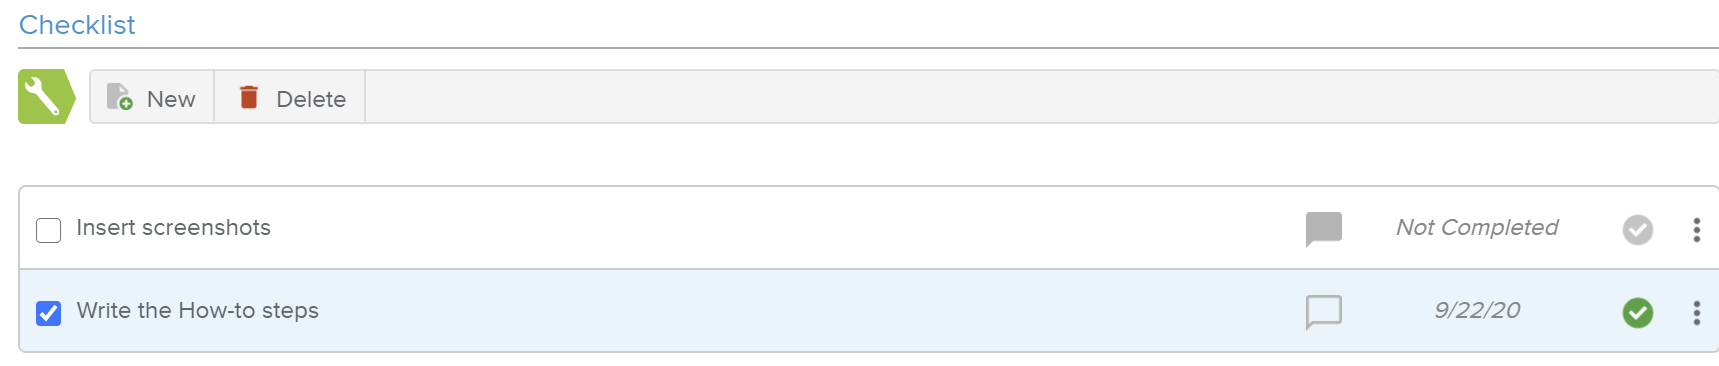
Each checklist item is identified by two attributes: Name and Completion Date.
The Completion Date is automatically filled in when an element is checked by the user.
In addition, the following tools are available to manage the checklist items:
| New | Opens a Checklist popup allowing the user to enter the following checklist attributes: Name, Done, Completed Date, and Description. |
 | Delete | Allows the user to delete the selected checklist item(s). This command is only available if at least one checklist item is selected (i.e., the corresponding checkbox is ticked). |
 | Description | Indicates whether a Description has been entered for the checklist item or not. |
 | Check | Allows the user to indicate that the checklist item is done. |
| More | Provides access to the following commands:
|
The Attachments section allows the user to attach documents (through URL links) to the selected Backlog Item. The spreadsheet provides the following attributes: Name and URL.
The following commands are available:
| New | Adds a new row to the spreadsheet. |
| Delete | Allows the user to delete the selected attachment(s). This command is only available if at least one attachment is selected (i.e., the corresponding checkbox is ticked). |
The Dependencies section allows the user to identify the Backlog Item’s predecessors.

The following commands are available:
| Create & Link | Opens the Backlog Item dialog box, allowing the user to create a new Backlog Item, which will be automatically defined as the Predecessor of the currently selected Backlog Item. |
 | Link to Existing | Allows the user to select an existing Backlog Item as the Predecessor of the current Backlog Item. |
| Delete | Deletes the selected Dependency. This command is only available when at least one dependency is selected (i.e., the corresponding checkbox is ticked). |
The Activity Log section allows users to indicate the effort spent on a Backlog Item. Each Activity Log entry is defined by the following attributes: User, Date, Actual Effort, and Comments.
The following commands are available:
| New | Adds a new entry in the spreadsheet for the user to fill in. |
| Delete | Deletes the selected Activity Log entry. This command is only available when at least one entry is selected (i.e., the corresponding checkbox is ticked). |
The Acceptance section provides users with a rich-text field where they can describe the criteria required for the Backlog Item to be defined as “Completed”.
Once those criteria are met, the Accepted field of the Backlog Item can be ticked.