The Work workspace, Billing tab has been designed to provide all the tools necessary to use the Billing feature.
The Billing tab features a view mode selection toolbar which includes the following:
 | Overview | Provides key facts and charts. |
 | Grid | Provides the list of tasks. |
 | Transactions | Displays all the Billable Savings Transactions, both at the Project and the Task level. |
 | Purchase Orders | Allows the user to manage purchase orders. This view mode is only available in single-project selection. |
 | Kanban | Allows the user to quickly update a task Billing Status. This view mode is only available in single-project selection. |
The Overview mode () allows Project Managers to quickly understand where they stand in terms of billing with the help of the charts provided and a Key Facts section.
The Key Facts section provides the following information: Total Revenues, Total Cost, Margin (Total Revenues/Total Cost), Billable Effort, and Non-Billable Effort.
The Distributed Revenues vs. Costs chart allows the user to compare the Total Revenues with the Project Total Cost per month for the duration of the whole project.
The Billed vs. To be billed chart illustrates the Billable Amount depending on what the Billing Status is.
Upon hovering the cursor over a portion of the chart, the exact amount to be billed is displayed.
The Purchase Orders chart allows the user to compare the Total Budget and the Total Revenues for each Purchase Order.
The Grid mode () provides the list of tasks with all the relevant Billing attributes.
The Billing spreadsheet toolbar is very similar to the Gantt toolbar and is made up of:
The Insert Tasks area,
The Commands area, and
Access to the Gantt Filters dialog box.
The Insert Tasks area gives users the opportunity to insert one or more tasks simultaneously into the project.

In order to insert some tasks, the user needs first to select the number of tasks that are to be created in the drop-down list, and then click on the Insert Tasks ( ) button.
The following options are available when inserting a task:
Insert Before | New rows for the newly created tasks will be inserted in the Gantt spreadsheet above the selected task at the same WBS level. |
Insert After | New rows for the newly created tasks will be inserted in the Gantt spreadsheet beneath the selected task at the same WBS level. |
Insert Children | New rows for the newly created tasks will be inserted as children in the Gantt spreadsheet beneath the selected task. If there are assignments on the new Parent task, then a pop-up will be displayed, warning the user that the assignments of the task will be deleted. |
If no task is selected when the Insert Tasks button is clicked, the new tasks created appear at the end of the list.
The toolbar provides the following commands (some of them will only be displayed once a task has been selected in the spreadsheet):
 | Insert Template | Allows the user to insert a Template as follows:
|
 | Indent | Allows the user to move the task one level lower in the WBS hierarchy. |
 | Outdent | Allows the user to move the selected task one level higher in the WBS hierarchy. |
 | Delete | Allows the user to delete the selected task(s). |
 | Summarize At Level | Allows the user to specify the level of detail (number of levels of descendant tasks) to display. |
 | Assign Resources | Provides access to the following commands:
|
 | Remove Resources | Provides access to the following commands:
|
 | Scroll into View | Allows the user to scroll the selected task automatically into the visible area of the Gantt chart graphic pane. |
 | More | Provides access to the following additional commands:
|
Upon clicking the Filters ( ) button located on the right-hand side of the toolbar, the Gantt Filters dialog box is displayed.
The user may activate several filters at the same time. As a consequence, only tasks that meet all of the criteria selected will be shown in the Gantt chart.
Once a filter has been activated, the Filters () button turns blue ( ).
).

For each task, the following attributes are displayed: Name, Start, Finish, Duration, % Completed, Billable, Confirmed, Billing Mode, Billable Amount, Purchase Order, Billing Status, and Billing Date.
The Billing Mode column is only displayed when the project Billing Mode is set to “Hybrid”.
The Billing Mode can be set in the Project Administration dialog box, Setup folder, by accessing the Billing Advanced Attributes.
Upon clicking on the Menu ( ) button located in the rightmost column, the Task Details dialog box is displayed.
The user can take advantage of the options available in the main toolbar to manage the spreadsheet display:
Billing Status | Allows the user to only display the tasks whose Billing Status is selected (“Billed” or “To be billed”). |
Billable Tasks Only | Allows the user to only display tasks that have been marked as Billable. |
The Transactions mode () allows the user to create and manage both project and task transactions whose Nature is “Saving” for the selected project(s).
Only Billable Saving Transactions are displayed in the Transactions mode. If a non-billable Saving Transaction has been created from this view, it will be displayed in the Finance workspace, Savings dialog box, Transactions sub-tab.
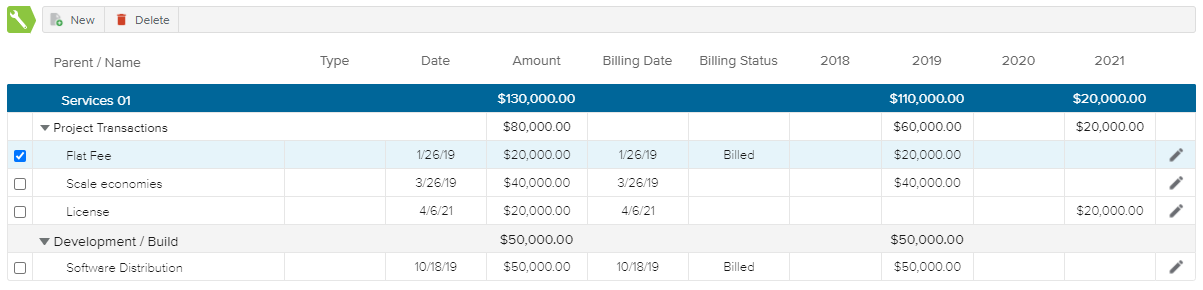
The Transactions spreadsheet shows the following transaction attributes: Parent (either a Task or a Project), Type, Date, Amount, Billing Date, and Billing Status.
The Billing Status is only editable for Project Transactions. For transactions attached to a task, the field will display the corresponding task’s Billing Status (read-only).
The Transactions spreadsheet provides the following tools:
 | New | Gives access to the following commands:
|
 | Delete | Allows the user to delete the selected transaction(s). This command is only available if at least one Transaction is selected (i.e. the corresponding checkbox is ticked). |
 | Details | Opens the Transaction dialog box. |
Saving Transactions created from this view will be automatically marked as Billable.
The Purchase Orders mode () allows the user to manage the project’s Purchase Orders. Each purchase order represents a bucket of money to be spent (i.e., billed).
The Purchase Orders mode is composed of:
The Purchase Orders List panel, which displays a toolbar and the purchase order cards.
The Purchase Order Details view, which displays detailed information for the selected Purchase Order.
The Purchase Orders Overview view, which displays information about all the selected project's Purchase Orders.
The upper part of the Purchase Orders List panel provides a toolbar with the following commands:
 | Clear selection | Allows the user to deselect all the cards that have been ticked. |
 | Add | Creates a new Purchase Order. |
 | Delete | Allows the user to delete the selected Purchase Order(s). This command is only available if at least one purchase order is selected (i.e., whose corresponding checkbox is ticked). |
Each Purchase Order is represented by a card, which displays the following Purchase Order attributes: Name, Amount Used, and % Consumed.
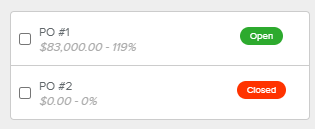
In addition, the user can see whether the Purchase Order is closed or not.
The % Consumed is computed as follows: Purchase Order Billable Amount/Budget.
When no Purchase Order has been selected in the Purchase Orders List panel, the Purchase Orders Overview view is displayed.
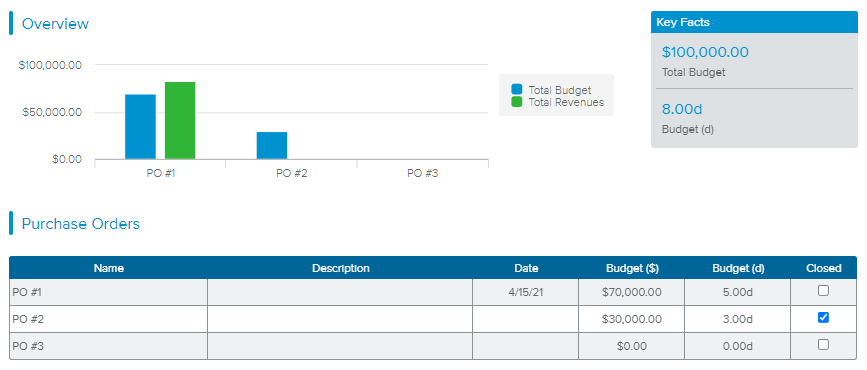
It provides the following information regarding all the Purchase Orders for the selected project:
The Overview chart indicates the Total Budget and the Total Revenues for each Purchase Order.
The Key Facts section indicates the Total Budget and the Total Budget in terms of days for the selected project.
The Purchase Orders spreadsheet lists all the purchase orders for the selected project, along with the following information: Name, Description, Date, Budget ($), Budget (d), and Closed.
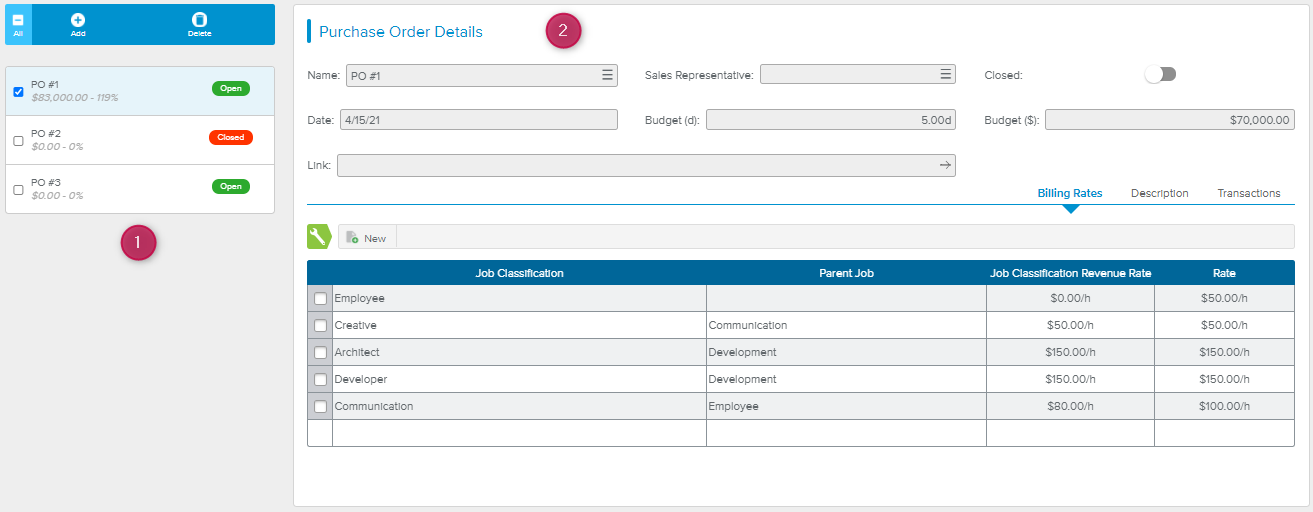
When a Purchase Order is selected, the Purchase Order Details view provides detailed information regarding the selected Purchase Order.
The following fields are available for viewing or editing information:
Name | Indicates the name of the Purchase Order. |
Sales Representative | Allows the user to select a Sales Representative from the list of users. |
Closed | Allows the user to indicate whether the Purchase Order is closed or not. Once closed, a purchase order cannot be attached to a task or a transaction. Note Closed Purchase Orders are not displayed unless the Show Closed display option is activated. |
Date | Indicates the Date of the Purchase Order (for information purposes only). |
Budget (d) | Allows the user to indicate the Budget of the Purchase Order in terms of days. |
Budget ($) | Allows the user to indicate the Budget of the Purchase Order in terms of money. |
Link | Allows the user to enter a URL link for the Purchase Order. Once the link is entered, the user can click on the arrow icon at the end of the field to directly open a new tab in his/her browser. |
As soon as the Purchase order is associated to a task, the Billing Rates sub-tab can be used to identify the Revenue Rate values to be used (by job classification) for calculating revenues.
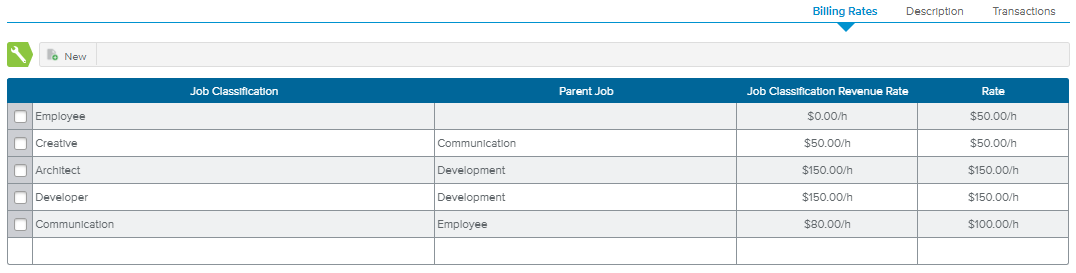
The following commands are available:
| New | Allows the user to add a new billing rate to the spreadsheet. |
 | Initiate | Provides the following options:
Note The Initiate command is only available when the project Revenue Rate Source is set to “Project.Job Classification”. |
The Description sub-tab provides a rich-text section, allowing the user to add additional information regarding the selected Purchase Order.
The Transactions sub-tab provides a view very similar to the Transactions mode. Upon creating a Transaction from the Transactions sub-tab, the newly created Transaction will be automatically associated to the selected Purchase Order.
The Kanban mode () allows the user to easily update the Status of the Billable Tasks.
The Kanban displays a swimlane in which each column represents a Billing Status (“Billed” or “To be billed”).
Each Billable Task is displayed in the form of a card with the following attributes: Billable Amount, Name of the task, Billing Date, and the list of resources assigned to the task.